


MQTTLAB.IOTSIM.IO/artik
Portal for public SaaS MQTT labs based on MIMIC MQTT Simulator for Samsung Artik .
You can try it yourself for free (no registration/credit card required), then upgrade to paid lab if you like it:
Artik Control System - FREE
Shared, read-only lab with Bosch sensors publishing unique JSON messages with temperature telemetry to your Samsung Artik account as detailed below. Access it here .
NOTE: Since it is shared, other people may be changing values at the same time you are. Lab is reset to known state at any point, but usually every hour on the hour EST. If you want your own lab, you can rent it here.
Artik Control System
Overview
This lab demonstrates integration of Samsung Artik and MIMIC MQTT Simulator to produce an out-of-the-box lab for immediate (within a couple of minutes) first-time setup and use of a realistic IoT Control System as demonstrated in this Youtube video.
This lab demonstrates a realistic MQTT-based control-system with a single actuator and multiple sensors. There is no limit to the scalability, but we'll show 1 actuator and 19 sensors (if you need more, send e-mail to sales@gambitcomm.com. ). The control system mimics the steady-state feedback loop between sensors and actuators, like in
- data centers
(equipment getting hot, triggering a cooling mechanism A/C or fan, sensors cooling down), or
- water-level monitoring in dams
(water levels rising, release valves activated), or
- traffic control systems
(vehicle counts rising, traffic light / gate activated)
- etc.
Features of this lab demonstrate:
- no prior requirements but a Samsung Artik account, ie. a Artik login;
- realistic devices that publish telemetry via MQTT;
- two-way communication between Artik and actuator/sensors;
- dynamic telemetry published over the internet to Artik and consumed as defined in the device type manifest;
- dynamic control actions via Artik rules
The power of MIMIC is not limited to this. If you have a scenario you need simulated, send e-mail to sales@gambitcomm.com.
Setup
This procedure is shown in this Youtube video.
To setup your lab, we recommend 2 browser windows side by side. In one of them you have your MQTT lab displayed, eg. as in this picture:
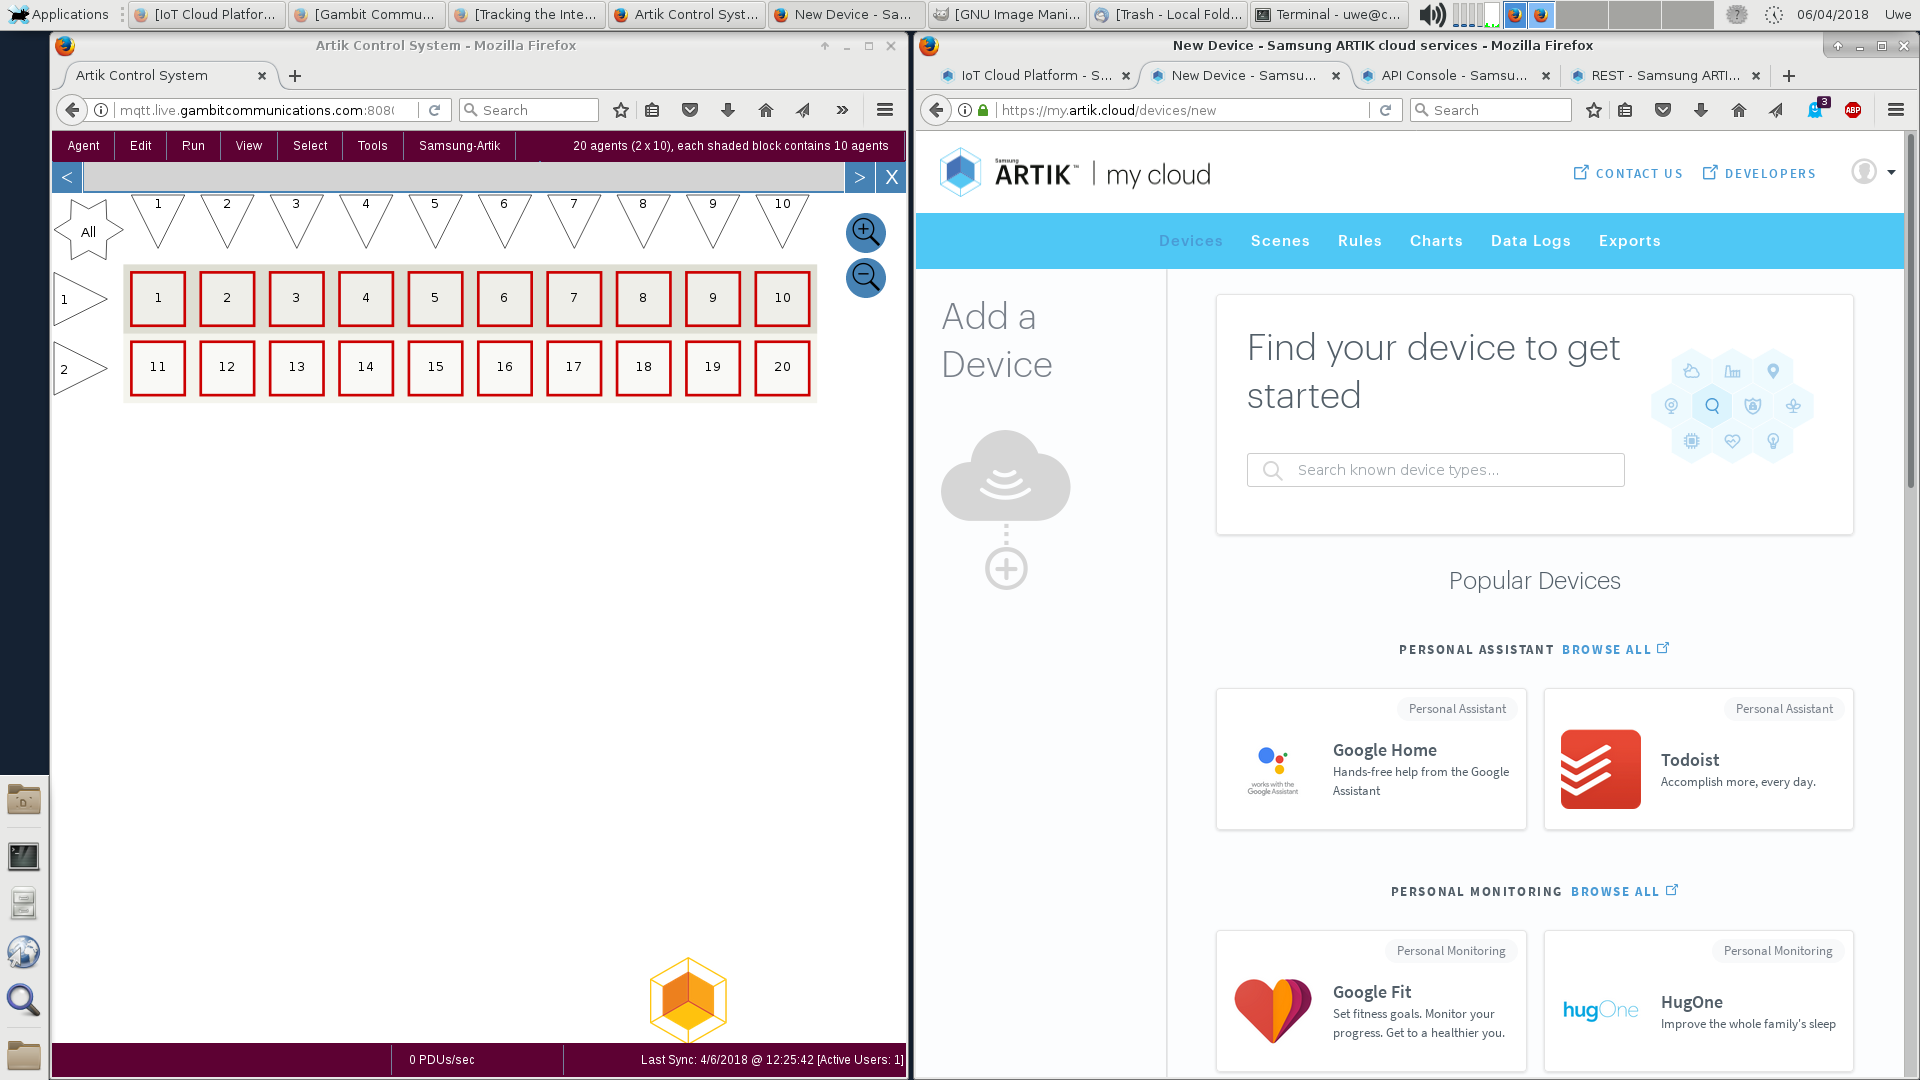
Figure 1 - 2 browser windows side-by-side
In the other browser window, in your empty Artik account, just navigate to your API console page and execute the first Get User Profile call by pressing on the call, then TRY IT!. If there is an error in the Response Body then you need to login to Artik, or refresh the window to get the latest Artik session parameters.
Then invoke the Samsung-Artik menu in your lab, and click on Configure Artik - Live.
In the resulting dialog copy/paste the following fields from the result output in your Artik API console window to the Configure Artik - Live dialog:
- from Request Headers copy the Authorization token without the leading Bearer into the Auth-Token field;
- from the Response Body copy the value of the "id" field, without the double quotes into the UserID field.
Once you click Ok, a new Run Script Console tab is opened with the output of the processing. Once it says Task completed, your lab is configured to work with your Artik account.
If you now reload the lab window, each icon should have a name underneath its number, eg. the first device should be named Actuator.
Using the lab
To start using the lab, first see that the device instances are showing in your your Artik dashboard.
You can chart the telemetry by clicking VIEW YOUR DATA. Add the first couple of devices, in this case Actuator, Bosch1 and Bosch10.
When you start the corresponding devices in the lab, you will see the telemetry charted in real-time.
In this lab, the temperature reported by the sensors increases while the Actuator device is turned off, and when they reach a threshold temperature, the Actuator is turned on, causing the temperatures to fall.
You can verify the rules that control the devices in your rules page. Since these rules were added by the API console, you need to click on Show rules private to other applications.
The bottom 2 rules control the devices.
Now you can investigate further how things work and change things on the fly.
Shutdown
To clear the lab, follow instructions of Q: What about privacy? in the next section.
Frequently Asked Questions
- Q: What will this cost me?
A: Running our pre-defined control system does not cost you anything.
- Q: What exactly does this do to my Artik account?
A: If you run the Configure Artik - Live dialog with your authentication parameters it will setup exactly 20 device instances of these pre-defined device types:
- MQTT Actuator 1 instance
- Bosch sensor 19 instances
and three new rules. for the control system.
- Q: What about privacy?
A: The lab will be able to access your account during the session because access tokens are stored in the lab device configurations. You can clear the device configurations when you are done with this procedure:
-
select all 20 devices (click All in the upper left star)
-
invoke Edit -> Configure -> Username
-
clear the text and press Ok
-
do the same with Edit -> Configure -> Password
- verify on any device by either checking with Edit -> Configure -> All MQTT Settings dialog, or by starting any sensor, it will not connect to your account any more
You can also revoke your authentication code in your active sessions page and in your API Console press REVOKE.
And you should delete the 20 device instances in your device page. For each of them, click the ... menu and select Delete device.
-
select all 20 devices (click All in the upper left star)