MQTTLAB.IOTSIM.IO/losant
Portal for public SaaS MQTT labs based on
MIMIC MQTT Simulator
![]() with
Losant
with
Losant
![]() as seen on the
partner page
as seen on the
partner page
![]() for
for
-
Losant training: learn in minutes, then go to the Losant University;
-
Rapid Prototyping: Create proof-of-concept applications with dynamic,
customizable, interactive demos for Losant applications, like the
demos
below;
- IoT Testing: Test your Losant applications for features, scalability and performance / latency.
Free, 24/7, interactive demos
Demo 1 - Asset tracking with analytics - detect breakdown in vehicle fleet
Check out this 2-minute
Youtube video
Click here![]() of a small fleet of vehicles updating their device status in Losant in
real-time, being graphed in the
Losant dashboard.
of a small fleet of vehicles updating their device status in Losant in
real-time, being graphed in the
Losant dashboard.
![]() to see
it live 24/7. Change it in real-time with our connected
vehicle fleet simulation
to see
it live 24/7. Change it in real-time with our connected
vehicle fleet simulation
![]() .
.
The vehicles are carrying precious cargo (think COVID vaccines), so you want to know about breakdowns as soon as possible. But, you don't want false alarms due to vehicles stuck in traffic. Thus, the analytics need to distinguish between temporary slow down and breakdown to avoid false alarms.
Try it out now to change the speed of vehicle 1 with the Demo menu. The first 3 menu items control only vehicle 1. Try it now. The Slider allows to change any selected vehicle. Allow a couple of seconds for the speed to show in the Losant dashboard. If any vehicle is stopped for more than a minute, a Breakdown is signalled. We reproduced the scenario in a couple of minutes, rather than hours or days. This is just a sample proof of concept to show you what is possible. The real analytics might take into consideration other factors, such as engine temperature, etc.
Demo 2 - Control System with failure scenario
Check out this 2-minute
Youtube video
Click here![]() of a
control system
of a
control system
![]() tracked by Losant in real-time, being graphed in the
Losant dashboard.
tracked by Losant in real-time, being graphed in the
Losant dashboard.
![]() to see
it live 24/7. If nothing is happening because the devices are off, then
change it in real-time with our connected
control system simulation
to see
it live 24/7. If nothing is happening because the devices are off, then
change it in real-time with our connected
control system simulation
![]() . Try it out now to start the equipment with the Demo
menu. Allow a couple of seconds for the temperature of sensor 1 to show
in the Losant dashboard. When the temperature goes too high, the actuator
(cooling) is turned on by the Losant workflow, temperature reported by
the sensor then declines, until actuator is turned off. Once it has
gone through a cycle between high and low temperature, you can create
a failure scenario by "breaking" something with the Demo
menu. Even though the actuator is on, the temperature does not go down.
Equipment is overheating. Let's hope there are analytics rules to detect this!
. Try it out now to start the equipment with the Demo
menu. Allow a couple of seconds for the temperature of sensor 1 to show
in the Losant dashboard. When the temperature goes too high, the actuator
(cooling) is turned on by the Losant workflow, temperature reported by
the sensor then declines, until actuator is turned off. Once it has
gone through a cycle between high and low temperature, you can create
a failure scenario by "breaking" something with the Demo
menu. Even though the actuator is on, the temperature does not go down.
Equipment is overheating. Let's hope there are analytics rules to detect this!
There - you have tested your control system in minutes, not hours or days.
Although no accounts are necessary to operate the demos, if you want to learn the internals you will need a Losant account to inspect the workflows in the application template , and a MIMIC lab to see the device configurations.
You can also try for free (no registration/credit card required) the other MQTT labs , then upgrade to this paid lab if you like it.
Losant Get Started Tutorial
Overview
Onboarding an external device to Losant for the first time is a task that until now took hours if not days. To overcome this hurdle, we created this Losant Getting Started Lab to get started in minutes.
This MIMIC MQTT lab demonstrates integration of
Losant
![]() and
MIMIC MQTT Simulator
and
MIMIC MQTT Simulator
![]() to produce an out-of-the-box lab for immediate first-time setup
and use of dynamically controllable
devices
to produce an out-of-the-box lab for immediate first-time setup
and use of dynamically controllable
devices
![]() .
By having a quick, successful example, you will short-circuit integration
of your own devices into Losant.
.
By having a quick, successful example, you will short-circuit integration
of your own devices into Losant.
Check out this 2-minute
Youtube video
![]() of an electrical generator updating predictable, customizable telemetry in
Losant in real-time, being graphed in this
Losant application
of an electrical generator updating predictable, customizable telemetry in
Losant in real-time, being graphed in this
Losant application
![]() .
.
There are more videos in the
Youtube channel
![]() listed on the right of this page
to show more advanced Losant features, such as analysis, events and actions.
listed on the right of this page
to show more advanced Losant features, such as analysis, events and actions.
This lab extends the Losant
Getting Started tutorials
![]() to set up within 15 minutes any number of realistic, third-party,
MQTT-based sensors publishing custom, dynamic telemetry that fits the
Losant
MQTT
to set up within 15 minutes any number of realistic, third-party,
MQTT-based sensors publishing custom, dynamic telemetry that fits the
Losant
MQTT
![]() guidelines.
There is no limit to the scalability, but we'll setup 1 sensor,
and then you can try the same yourself on any
number in the lab for your requirements (if you need more sensors,
send e-mail to sales@gambitcomm.com).
guidelines.
There is no limit to the scalability, but we'll setup 1 sensor,
and then you can try the same yourself on any
number in the lab for your requirements (if you need more sensors,
send e-mail to sales@gambitcomm.com).
Features
Features of this lab include:
- no prior requirements except for a valid Losant account, ie. a
Losant login
 ;
;
- no extra setup of hardware, NODE.JS, or cloning of Github source code;
- step-by-step, clear instructions for all tasks;
- 1 realistic sensor (or more) that publishes telemetry via
MQTT
;
- each sensor is authorized to access your account (and only your account) in Losant, just like real devices will have to be;
- dynamic telemetry published over the internet to Losant and reflected in the device state;
- real-time, interactive control of the telemetry to reproduce any scenario you want at any point in time;
- investigate all aspects of Losant interaction with a third-party device;
- finally, verifiable cleanup of everything we setup automatically.
Tasks
These are the tutorial steps you are going to perform to get going quickly:
Do you have questions? Maybe we answered them in the FAQ below. If not, contact our support team.
The power of MIMIC is not limited to this. If you have a scenario you need simulated, send e-mail to sales@gambitcomm.com.
Step 1: Setup
Objective
Sign up to your own Losant account if you have not done it. This takes 5 minutes.
NOTE: NEVER give out your Losant account login username and password to anyone you don't trust.
Procedure
If you have not already signed up for an account, first go to
their home page
![]() and press START BUILDING to sign up for a Losant account.
and press START BUILDING to sign up for a Losant account.
Then review
What is Losant?
![]()
To operate your lab, we recommend 2 web browser (Chrome, Firefox, Edge, ...) windows side by side. For example in the left browser window you can have your MIMIC MQTT lab for Losant, and in the right your Losant cockpit, logged into your Losant account, eg. as in Figure 1:
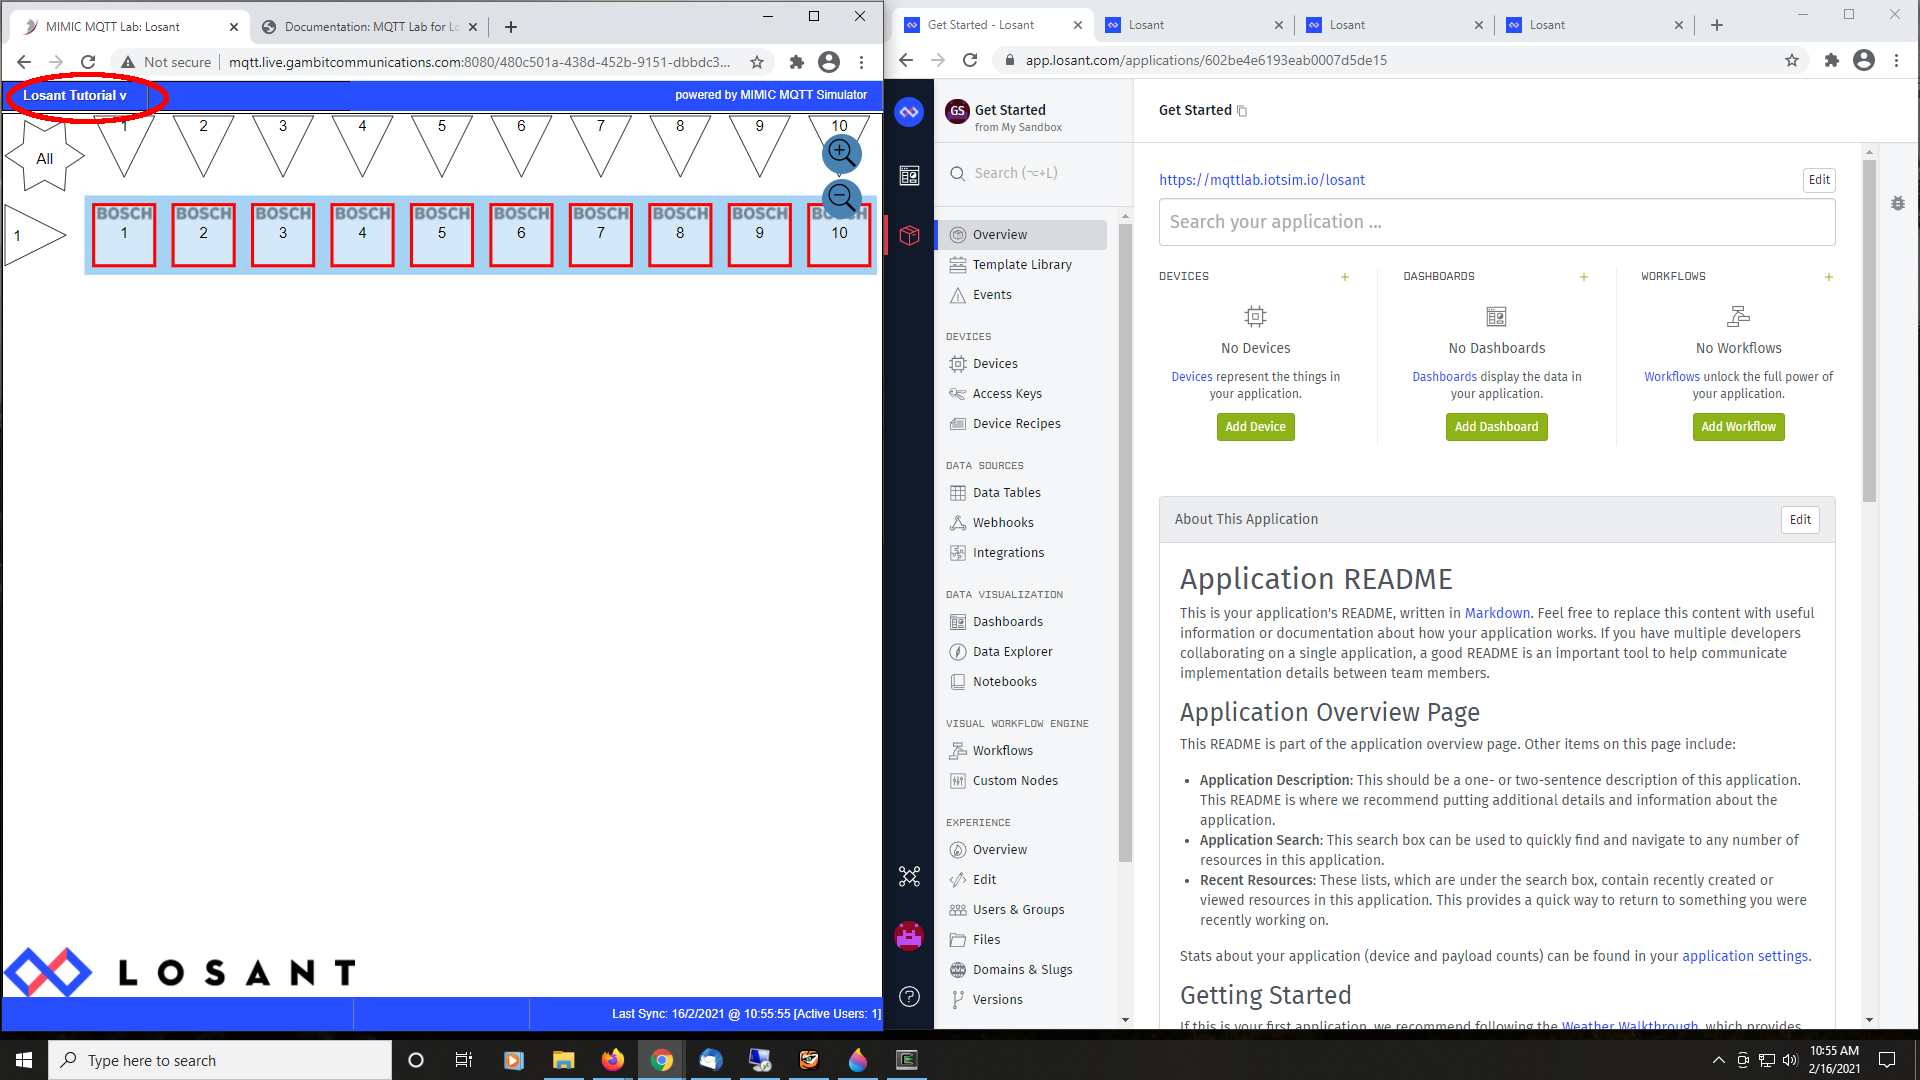
Figure 1 - 2 browser windows side-by-side
When we point to features in either of the windows, they will be highlighted with a red circle. For example, in Figure 1 above we have highlighed the main menu of MIMIC lab and that of the Losant cockpit. Check it out by clicking on the Figure 1 picture to open it (make it larger). Then press your browser Back button (left arrow) to get back to this page.
You can maximize either of them when working in one window for a while. When you press README or Help in the MIMIC lab (left browser window), it will open another tab with the help page. Clicking on links in this document to external pages will also open in separate tabs. That way you can switch between the tabs, or lay them out however you wish.
To check it out, click on Losant Tutorial, then the top README menu item, and the help page titled Documentation: MQTT Lab for Losant appears in a new browser tab. Close the tab by clicking on its x, or switch back to the previous tab.
Losant has various ways of onboarding devices, whether
directly
![]() or
indirectly
or
indirectly
![]() ,
even a built-in
simulator
,
even a built-in
simulator
![]() .
We will show you how to connect an external device via MQTT in
a matter of minutes.
.
We will show you how to connect an external device via MQTT in
a matter of minutes.
Results
You signed up to Losant, and you are ready to use the MIMIC MQTT Lab to add a device, investigate how it connects, and play with it.
Step 2: Add Device(s)
Objective
The left MIMIC MQTT lab browser window shows red icons, one for each simulated device. This is the equivalent of your real-world devices sitting on your lab bench. They are not doing anything.
We need to configure one of the devices to publish telemetry to Losant
according to the Losant
MQTT
![]() rules. This task configures the simulated devices to use the access
parameters (key and secret) that you configured in Losant.
rules. This task configures the simulated devices to use the access
parameters (key and secret) that you configured in Losant.
Procedure
-
Let's first check on the devices in your Losant account (right browser
window).
-
Click on the Devices menu. There should be no devices,
if this is a fresh account. Else, it will show the devices that are
registered in this account. There should be no devices from this lab
until the next step.
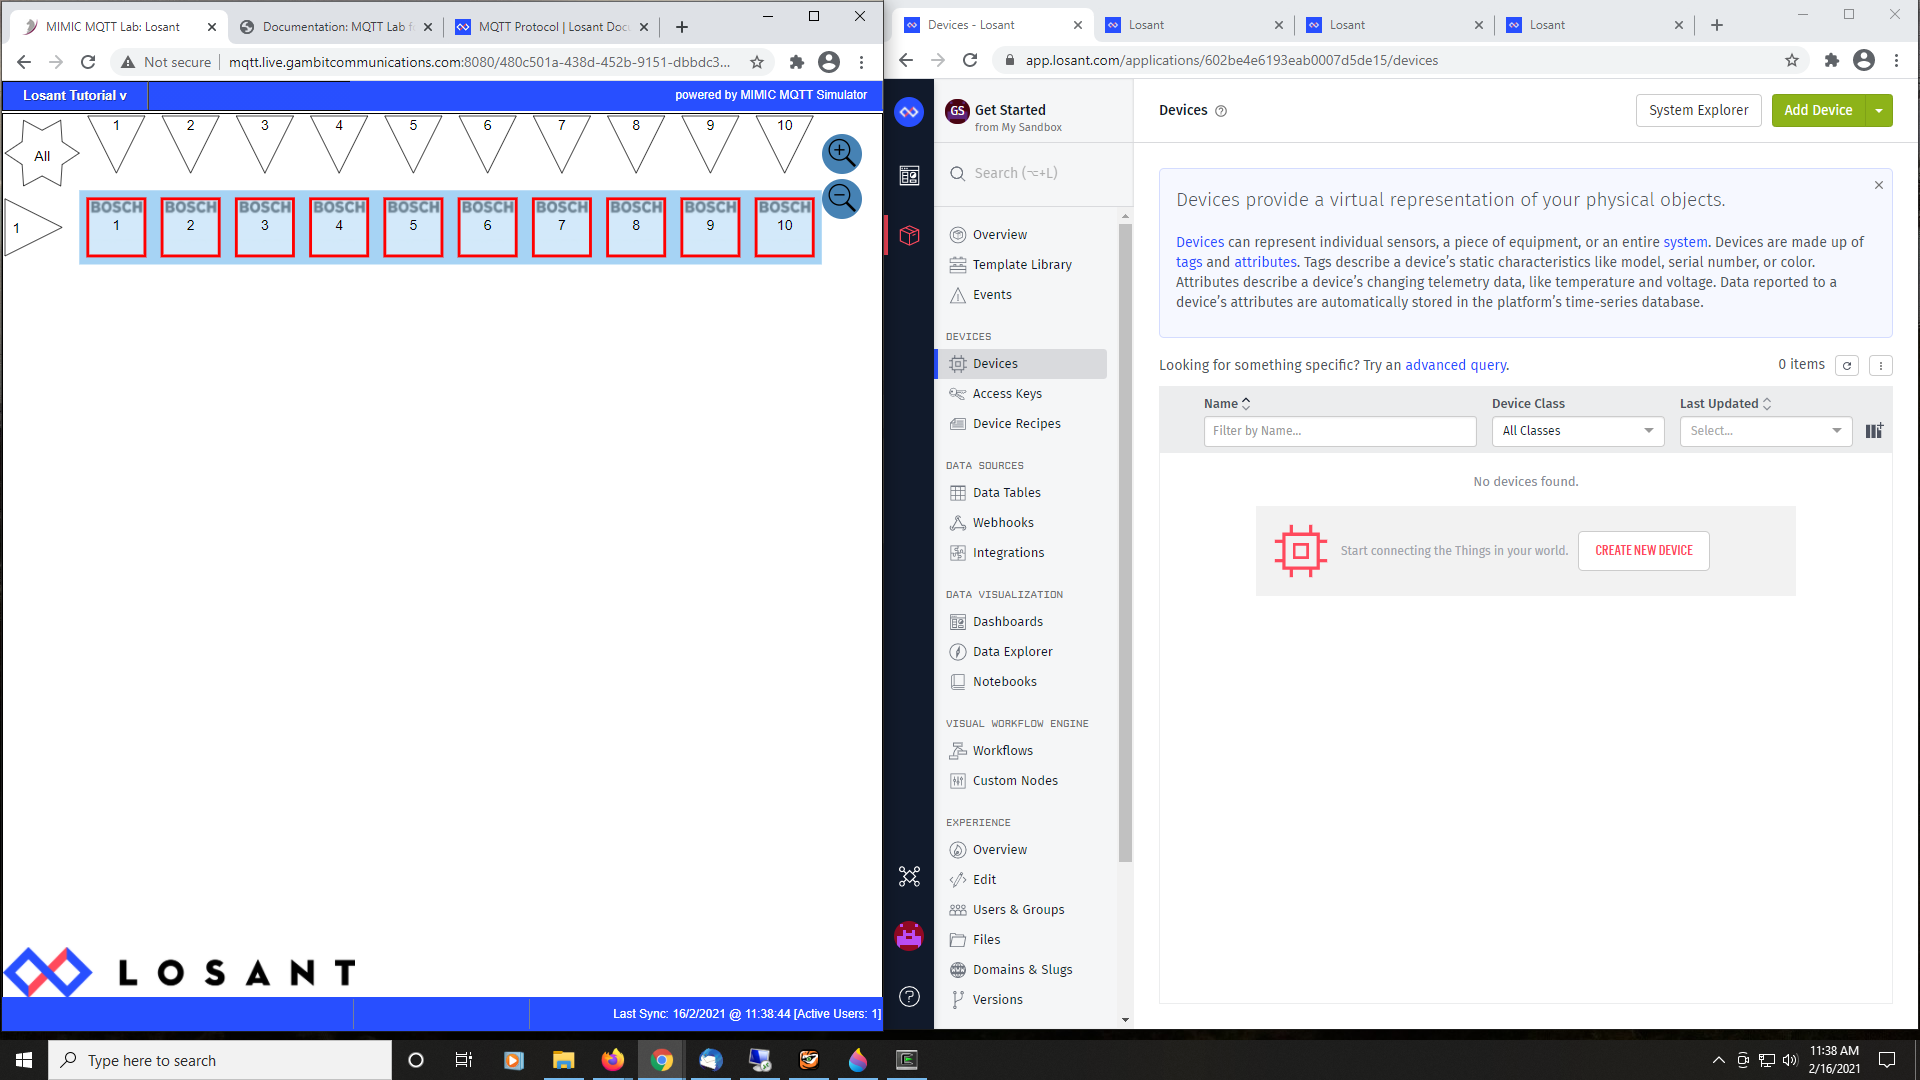
Figure 2 - Losant Devices
-
Press CREATE DEVICE, and pick Standalone from the list.
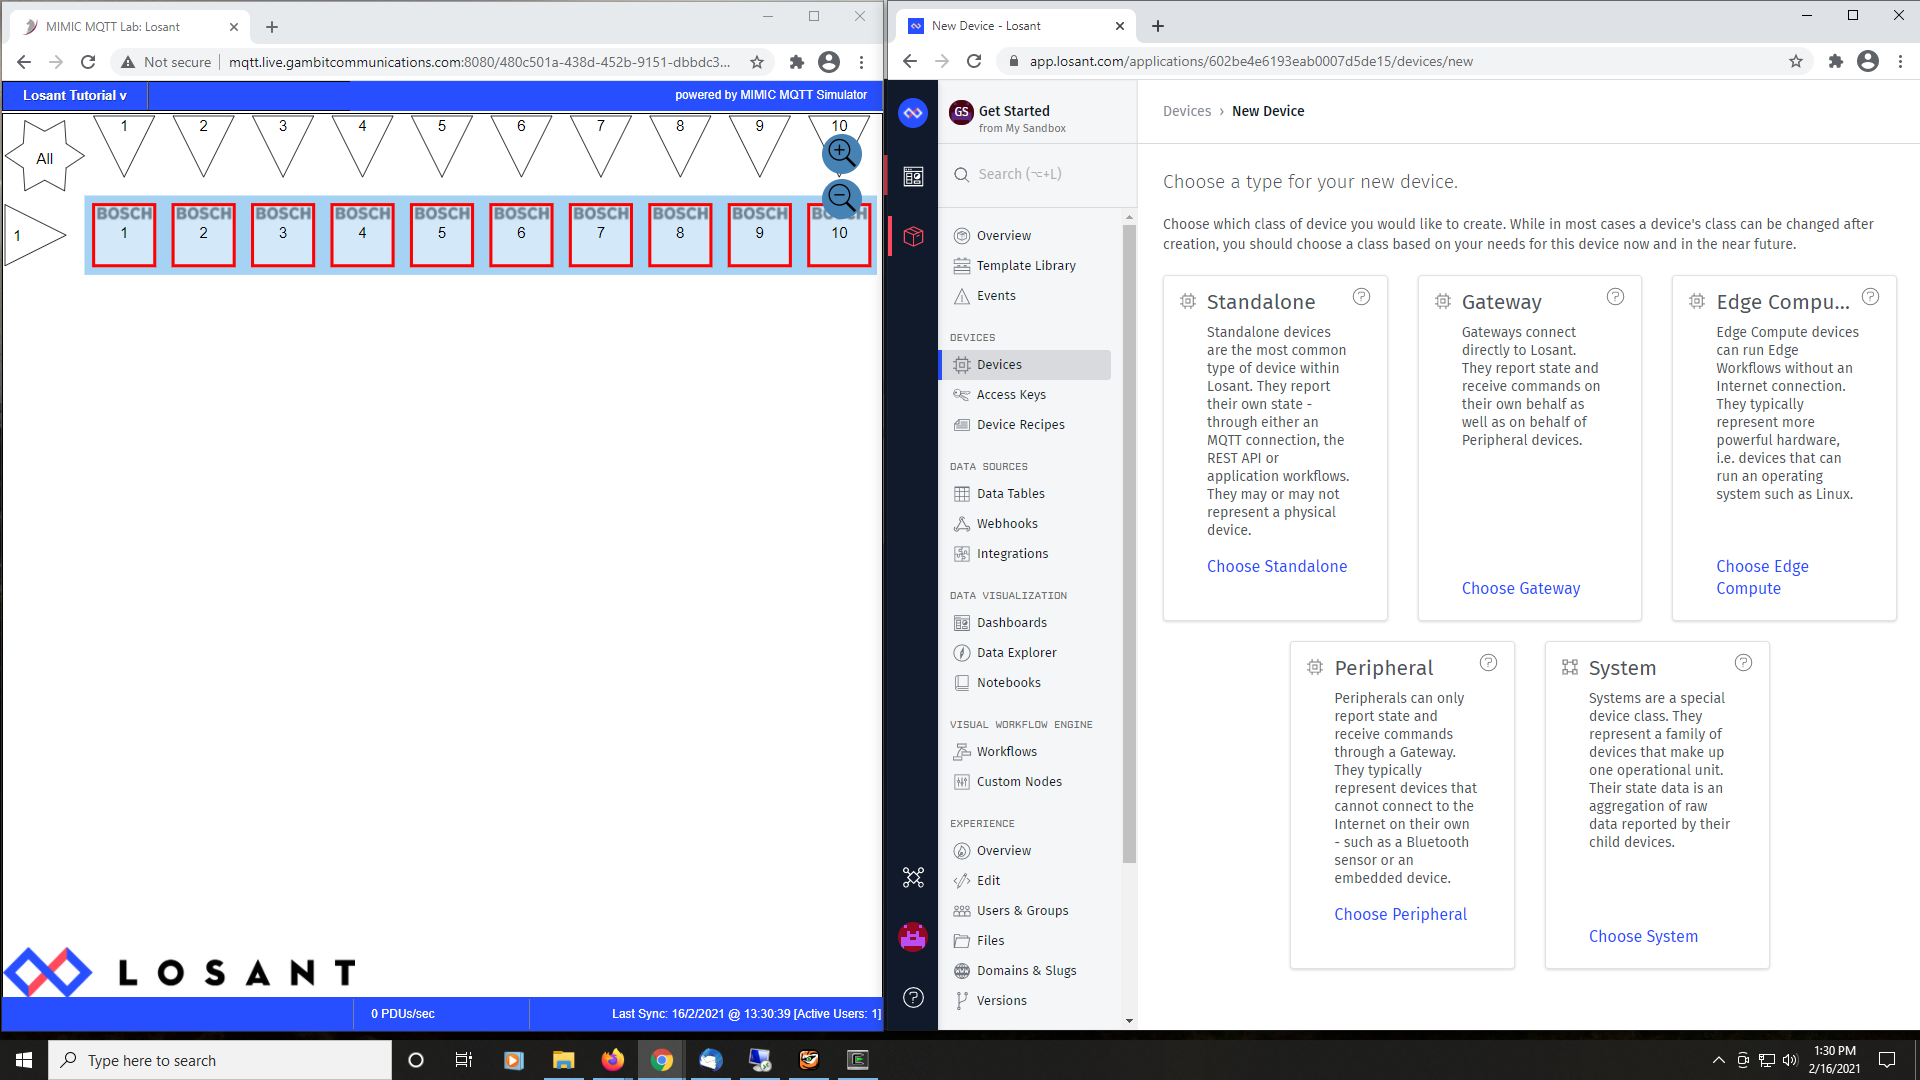
Figure 3 - Losant New Device
-
In the displayed New Standalone Device page, fill in any
memorable name, for example mimic-1 for the first MIMIC device,
then Create Device at the bottom. We don't have to fill in any
more information.
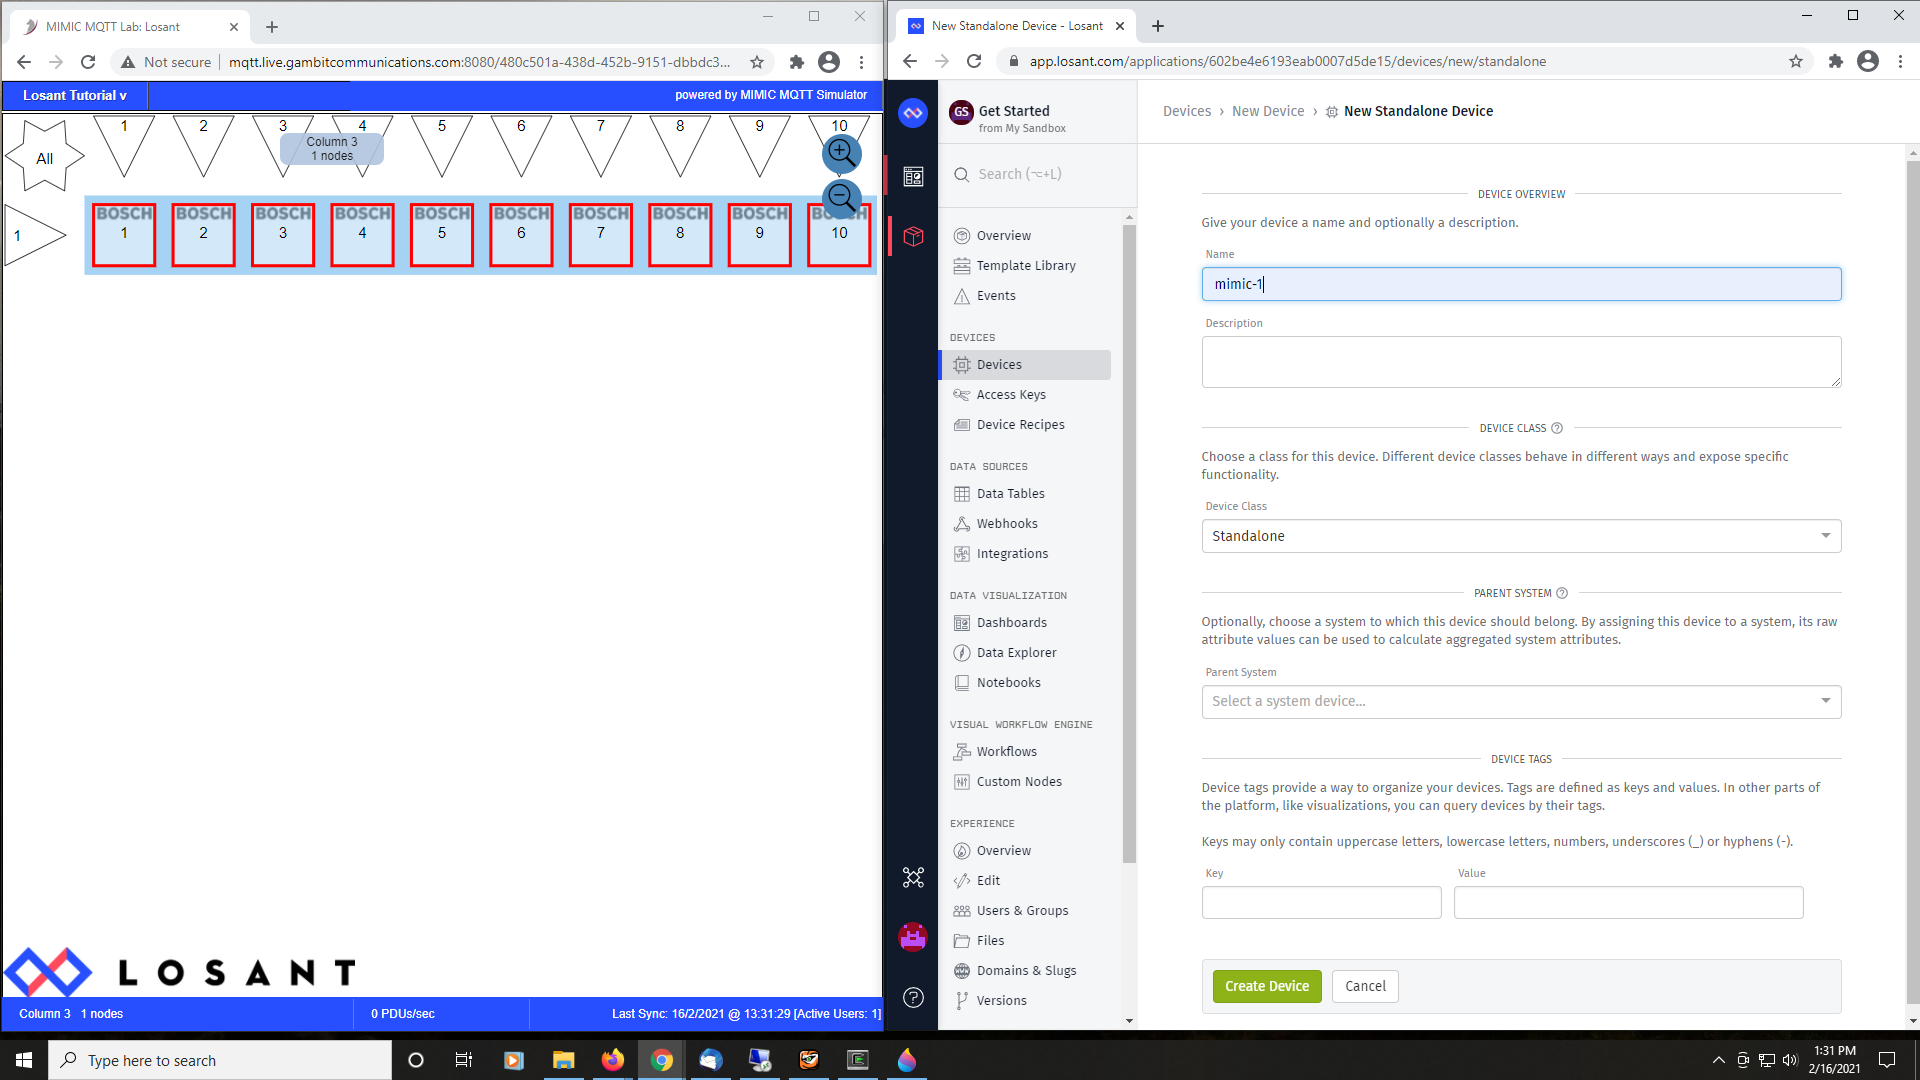
Figure 4 - Losant New Standalone Device
-
In the MIMIC Losant lab (left browser window) click on
Losant Tutorial -> Step 2: Add Device.... The
Step 2: Add Device dialog appears.

Figure 5 - Step 2: MIMIC Add Device dialog
-
In the right-hand side Losant cockpit, in the device list, copy/paste
the ID into the left-side Device ID field.
-
Pick the right menu for the newly created mimic-1 in the device list,
and click Create Access Key.
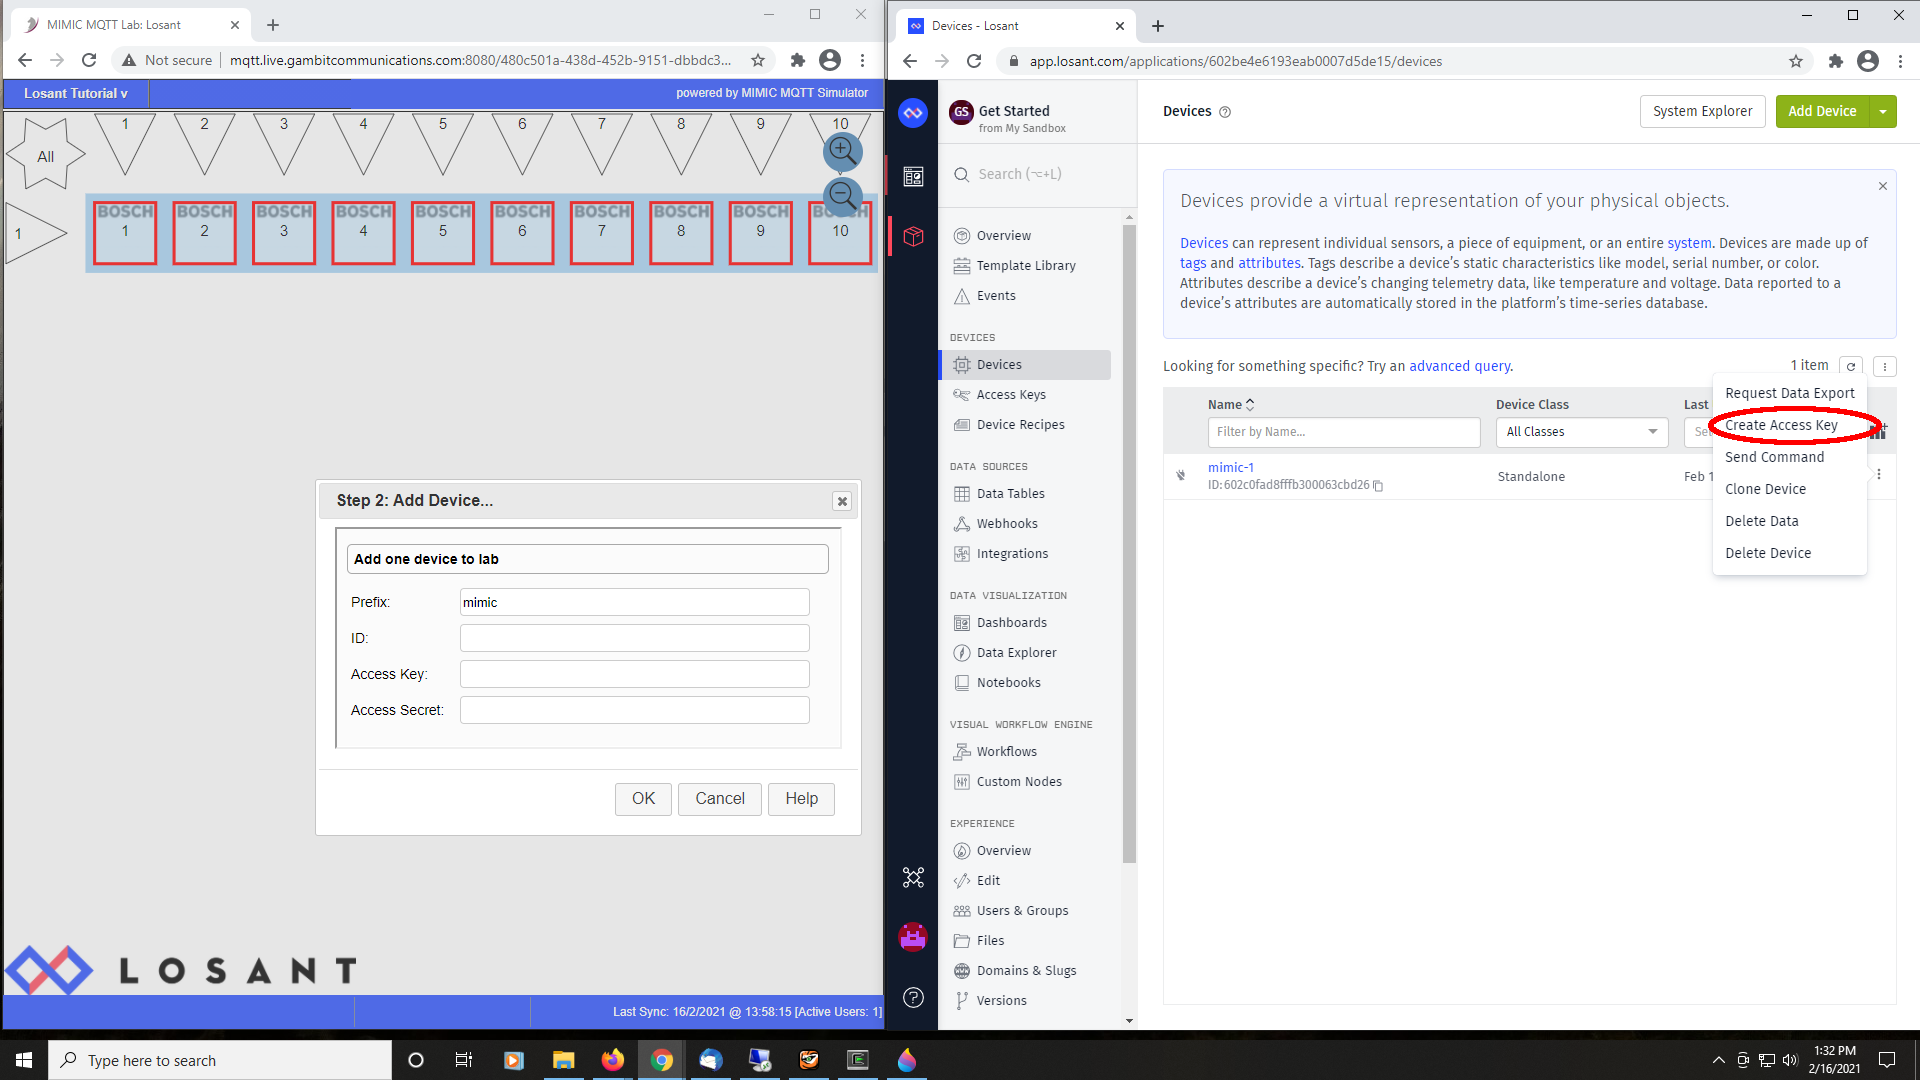
Figure 6 - Create Access Keys
-
In the New Access Key dialog, copy/paste both the Access
Key and the Access Secret, eg. into a new file on your
computer.
These will be input in the lab for a new device, just like
you would have to do for your real device when you provision it.
Or, you can just copy/paste them directly into the dialog.

Figure 7 - New Access Keys
-
Type the Prefix for the NAME of the device to be
created in your Losant account. We recommend to keep mimic,
that way you can find it easily later. The first device will be
mimic-1.
-
Once you click OK, a new Run Script Console tab is
opened in the browser with the output of the processing. When it says
Task completed, and there are no ERROR
messages, your new sensor device is configured in the MIMIC MQTT Lab,
ready to connect to your Losant account. You can dismiss this tab,
or switch back to the lab browser tab titled MIMIC MQTT Lab: Losant.
-
If it does not have it already, when you now reload the MIMIC MQTT
Lab window, the first icon should have a name underneath its number,
eg. the first device will be named mimic-1. It is
red
because it is currently stopped. This is the equivalent of the
device sitting on your lab bench in the real world with power switched
off.
- If the above was not clear, don't worry. We show a video of this entire procedure in the next section where we generate telemetry from the device.
Results
We configured a new device with name mimic-1 and configured it with the authentication parameters necessary to connect to Losant;
You are now ready to experiment with this device in the next sections.
Using the lab
To start using the lab, first verify that at least one device with the chosen prefix, eg. mimic-1, is showing in your MIMIC MQTT Lab.
Step 3: Start Device(s)
Objective
The devices in your lab are stopped, equivalent to lab equipment sitting on your lab bench and powered off. So they are not doing anything. We need to power up the recently configured device, the one that is labelled mimic-1.
Procedure
To start it, select the icon(s) of the device(s) you want to start. Each selected device will have a blue indicator in the upper left. Then click on Losant Tutorial -> Step 3: Start Device(s) -> Go!.
The selected icon(s) will turn green, as if you had turned power on.
Just like the equipment on your lab bench, whether it delivers telemetry to Losant or not depends on whether you have configured the correct parameters in the MQTT client software.
In this lab, if you added the device as in the section above and there were no errors, then it will publish telemetry once a second. You will know that it works when a orange <--> arrow appears in the icon, indicating activity.
This 2-minute
Youtube video
![]() shows how to create your first device in Losant and generate dynamic
telemetry:
shows how to create your first device in Losant and generate dynamic
telemetry:
From the Device Log you see that the telemetry will be updating. In particular, we made it so that the Light value changes frequently at random, like a flickering light. We'll see it in a dashboard in the Step 5: Change Telemetry section below.
Results
The icon of the selected device shows green to indicate that it is started, and telemetry is published to Losant. Now you can investigate further how things work, and change telemetry on the fly.
Step 4: Investigate
Objective
Now that it is running, you'll want to see how the lab device and your Losant device state are linked. That way you can reproduce this with your real devices.
Procedure
To check the configuration of the device in your Losant Device Management page, click on the device name, and then click Info on the left.
To check the configuration of the simulated device in MIMIC, select the device icon in the lab, then click on Losant Tutorial -> Step 4: Investigate -> MQTT Configuration...
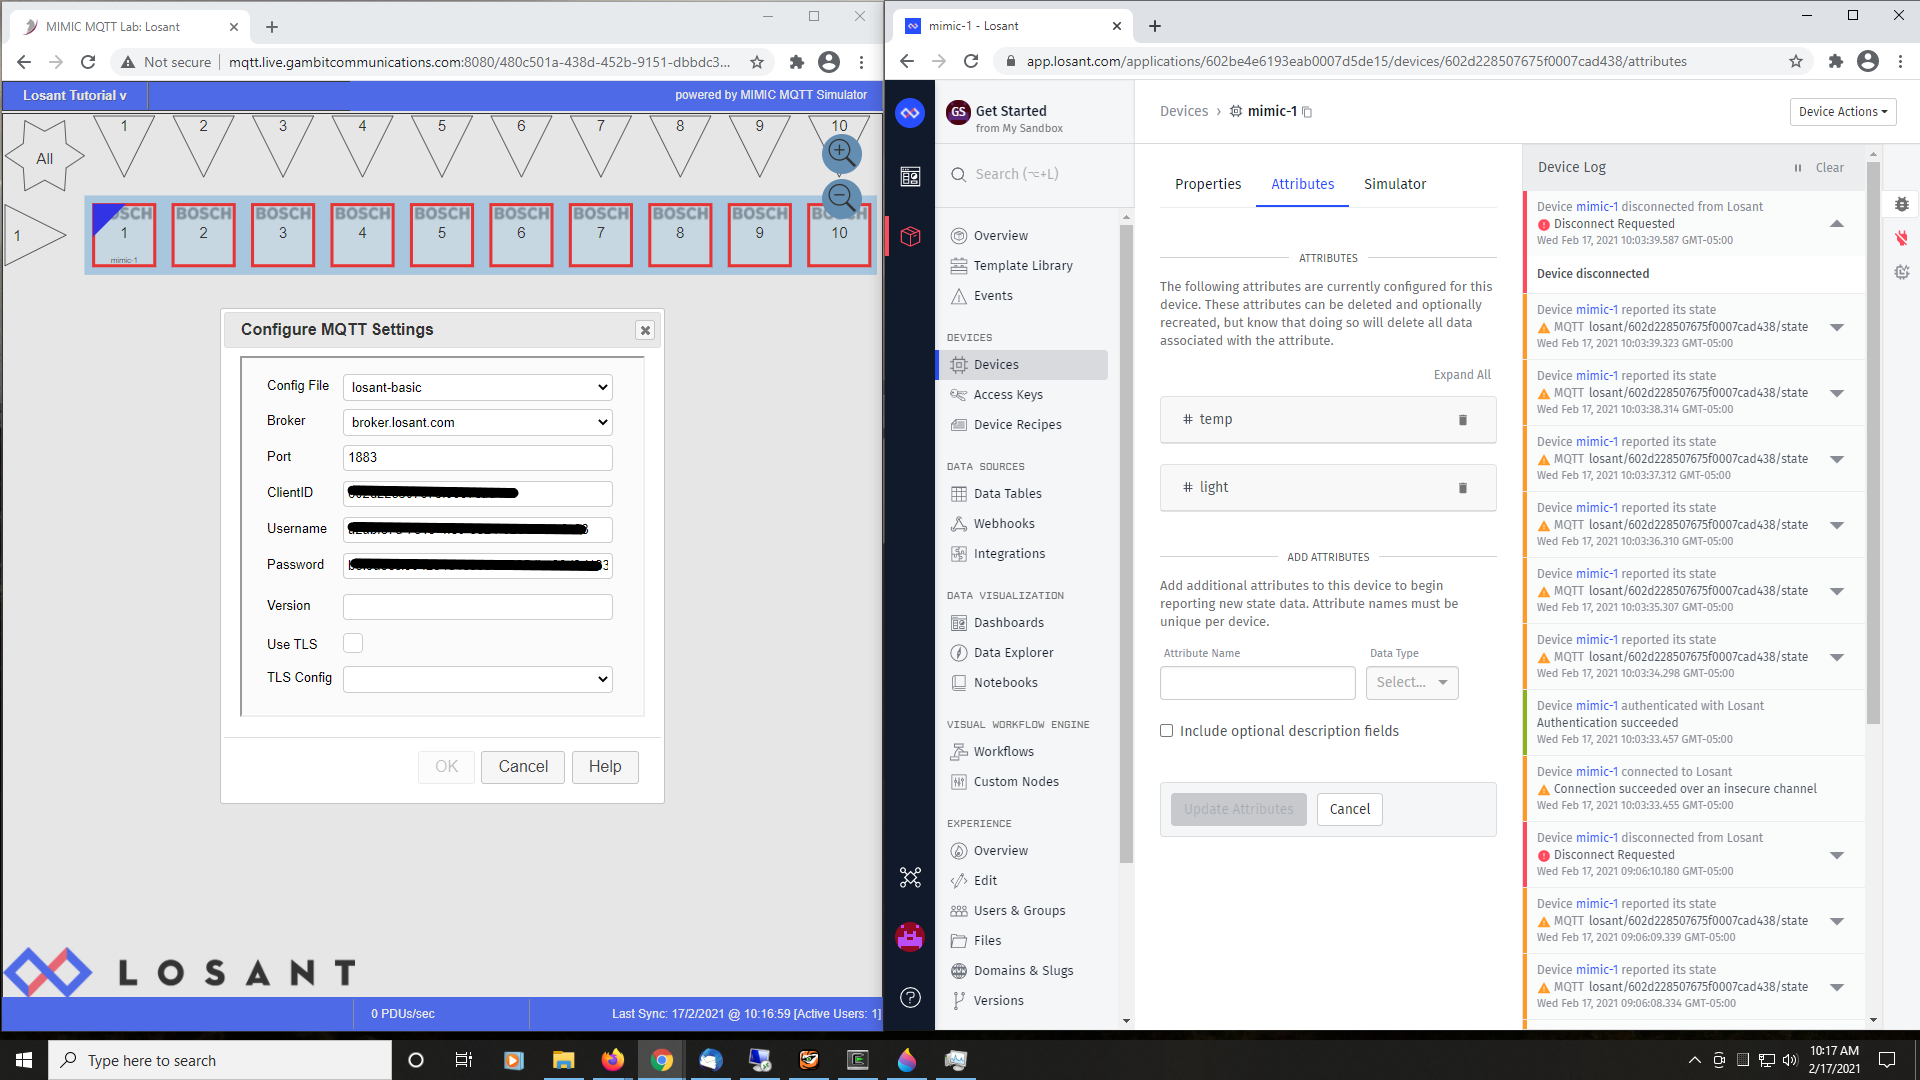
Figure 4 - Step 4: MQTT Configuration
The important configuration parameters for the device are the
-
Config File - this defines the MIMIC simulation: what MQTT payload
to send where and when. Here we publish once a second the telemetry to
the device topic with a JSON message containing the desired telemetry.
The Light value changes at random for this tutorial. This simulates a very dynamic attribute that changes at every sample.
Finally, the Temperature values can be dynamically controlled to achieve on-demand, consistent, real-time results, eg. in the Step 5: Change Telemetry section below.
-
Broker - your Losant broker broker.losant.com
-
Port - 1883 for insecure MQTT communications
-
ClientID - same as the Losant device ID
-
Username - same as the Losant device Access Key
-
Password - same as the Losant device Access Secret
- Use TLS - set to false to use insecure MQTT
These are the configurables you would have to setup minimally in your real-world device to communicate with Losant.
NOTE: The OK button is disabled in this lab. More advanced labs allow you to configure anything on the simulated devices.
Results
We verified the necessary configuration for a device to communicate with Losant.
Step 5: Change Telemetry
Objective
You are seeing real-time, dynamic telemetry in your digital twin on Losant. The Temperature value is static, while the Light value changes at random, like a flickering light. In this task we will interactively change the temperature to some other predictable value. This lets you change the temperature on-demand, eg. a device over-heating. Imagine the effort to do this with a real device.
Procedure
If you have not done so already above, in the MIMIC lab window select the icon(s) of the device(s) you want to manipulate and start it. Each selected device will have a green icon and a blue indicator in the upper left. Then click on Losant Tutorial -> Step 5: Change Telemetry....
In the Step 5: Change Telemetry dialog, change the Temperature value to something else, eg. 60000. As soon as you slide the slider to a new value, the new temperature value is published. If you click OK, the value is preserved, if you click Cancel, the value goes back to what it was when you entered the dialog.
In this 2-minute
Youtube video
![]() we see the temperature and light telemetry
updating in real-time. While the temperature is precise and predictable,
the light intensity behaves randomly like a flickering light.
we see the temperature and light telemetry
updating in real-time. While the temperature is precise and predictable,
the light intensity behaves randomly like a flickering light.
Results
We changed temperature telemetry on the fly, on-demand, predictably. You can use this technique when it comes to testing your application for certain conditions.
Step 6: Stop Device(s)
Objective
Your lab devices are continuously generating telemetry and publishing messages to Losant. This task stops them, the equivalent of powering down the real equipment.
Procedure
In the MIMIC lab window select the icon(s) of the device(s) you want to stop. Each selected device will have a blue indicator in the upper left. Then click on Losant Tutorial -> Step 6: Stop Device(s).
The icon(s) will turn red, and messages cease to be published.
This is the equivalent of turning power off to your real device.
Results
We stopped the devices to stop publishing messages.
Step 7: Advanced Tasks
These are further optional tasks you can do in your lab:
-
repeatedly do
Step 2: Add Device
, and it will add more things with incrementing instance number upto
the total allowed in your lab. Once you start the lab devices,
you will see independent telemetry for each;
-
create other
dashboards
to display the telemetry any way you want;
-
test
workflows
,
actions and events
to act on the telemetry received, as shown in this
2-minute Control System video
;
-
import our
real-time asset tracking demo
application template and create a real-time scenario;
-
import our
real-time control system demo
application template and create a real-time scenario;
Step 8: Cleanup
Objective
Once a lab is setup, you want to clean it up when you are done, to be certain no left-over devices have access to your account. This procedure makes certain there are no left-overs.
Procedure
The Losant Tutorial -> Step 8: Cleanup... lets you cleanup devices setup in the lab. Just select the device(s), then that menu item cleans up any associated resources from the MIMIC MQTT Lab. You need to delete the associated devices from Losant.
Once you have deleted a device, you can add one back in with different credentials with the Add step above.
Frequently Asked Questions
- Q: What will this cost me?
A: Besides the fixed cost for the MIMIC MQTT lab, there will be Losant costs
in your Losant account that we cannot control, beyond
their free evaluation.
- Q: What exactly does this do to my Losant account?
A: If you run the Step 2 - Add dialog with correct Losant authentication parameters, and start the device, it will setup exactly 1 device instance in your Losant account. Any subsequent devices connecting to Losant from this lab will be added as well.
Since we NEVER know your account authentication parameters, we cannot do anything else to your account.
- Q: What about security / privacy?
A: The lab will be able to access your account during the session because device authentication parameters (keys) are stored in the lab configuration. You can change keys for the devices in your Losant device dialog. Then you can verify that the devices can no longer talk to your account. This is verifiable cleanup, ie. you have proven that the outside device cannot access any more.
- Q: Where can I get help?
A: For the MIMIC lab select the README menu item, or press the Help button in any dialog. If you still need help, send e-mail to support@gambitcomm.com.
For Losant, see their Documentation
or
online community
.
- Q: What next?
A: This lab gives you a small successful step in connecting a few third-party sensors publishing real-time, dynamic, predictable, controllable telemetry to Losant in a matter of minutes. The next steps are up to you:
- You can build on what you learned to connect your own devices to
Losant;
-
Explore our other free resources / videos to learn about solutions to
common problems you will encounter in IoT development;
-
You can
rent an advanced lab
anytime you need to test different aspects of your
application, or lease a longer-term
MIMIC MQTT Simulator
with more features;
- You can scale the deployment to as many devices as you need to test, demo, train your IoT Application.
- You can build on what you learned to connect your own devices to
Losant;