MQTTLAB.IOTSIM.IO/gcp
Portal for public SaaS MQTT labs based on
MIMIC MQTT Simulator
![]() with
Google Cloud IoT Core
with
Google Cloud IoT Core
![]() for Google IoT training.
for Google IoT training.
You can try for free (no registration/credit card required) the other MQTT labs , then upgrade to this paid lab if you like it.
Google IoT Get Started Tutorial
Overview
Onboarding an external device to Google IoT for the first time is a task that until now took hours if not days. To overcome this hurdle, we created this Google IoT Getting Started Lab to get started in minutes.
This MIMIC MQTT lab demonstrates integration of
Google Cloud IoT Core
![]() and
MIMIC MQTT Simulator
and
MIMIC MQTT Simulator
![]() to produce an out-of-the-box lab for immediate first-time setup
and use of dynamically controllable
devices
to produce an out-of-the-box lab for immediate first-time setup
and use of dynamically controllable
devices
![]() .
By having a quick, successful example, you will short-circuit integration
of your own devices into Google Cloud IoT.
.
By having a quick, successful example, you will short-circuit integration
of your own devices into Google Cloud IoT.
Check out this 2-minute
Youtube video
![]() of 100 simulated devices updating their device status in Google Cloud IoT in
real-time, and a pubsub application monitoring their temperature.
of 100 simulated devices updating their device status in Google Cloud IoT in
real-time, and a pubsub application monitoring their temperature.
This lab extends the Google Cloud IoT Core
Quickstart
![]() to set up within minutes any number of realistic, third-party,
MQTT-based sensors publishing arbitrary JSON telemetry that fits the
Google Cloud IoT device guidelines.
There is no limit to the scalability, but we'll setup 1 sensor
and then you can try the same yourself on any
number in the lab for your requirements (if you need more sensors,
send e-mail to sales@gambitcomm.com).
to set up within minutes any number of realistic, third-party,
MQTT-based sensors publishing arbitrary JSON telemetry that fits the
Google Cloud IoT device guidelines.
There is no limit to the scalability, but we'll setup 1 sensor
and then you can try the same yourself on any
number in the lab for your requirements (if you need more sensors,
send e-mail to sales@gambitcomm.com).
Features
Features of this lab include:
- no prior requirements except for a valid Google Cloud IoT Core account, ie. a
Google Cloud IoT login
 ;
;
- no extra setup of NODE.JS or cloning of Github source code;
- step-by-step, clear instructions for all tasks;
- 1 realistic sensor (or more) that publishes telemetry via
MQTT
;
- the sensor is authorized to access your account (and only your account) in Google Cloud IOT Core, just like real devices will have to be;
- dynamic telemetry published over the internet to Google Cloud and reflected in the device state;
- real-time, interactive control of the telemetry to reproduce any scenario you want at any point in time;
- investigate all aspects of Google Cloud IoT interaction with a third-party device;
- finally, verifiable cleanup of everything we setup automatically.
Tasks
These are the tutorial steps you are going to perform to get going quickly:
Do you have questions? Maybe we answered them in the FAQ below. If not, contact our support team.
The power of MIMIC is not limited to this. If you have a scenario you need simulated, send e-mail to sales@gambitcomm.com.
Step 1: Setup
Objective
Setup a temporary project and device registry in Google Cloud for this lab. This guarantees that any outside access only goes through this temporary project. Later, when you remove the project, all further access will be denied.
This procedure is shown in this 3-minute
Youtube video
![]() .
You can follow along step-by-step by just pausing the video as needed.
.
You can follow along step-by-step by just pausing the video as needed.
Procedure
To operate your lab, we recommend 2 web browser (Chrome, Firefox, Edge,
...) windows side by side. For example in the left browser window you can
have your MIMIC MQTT lab for Google Cloud,
and in the right your Google Cloud console, logged into your
Google Cloud IoT login
![]() , eg. as in Figure 1:
, eg. as in Figure 1:
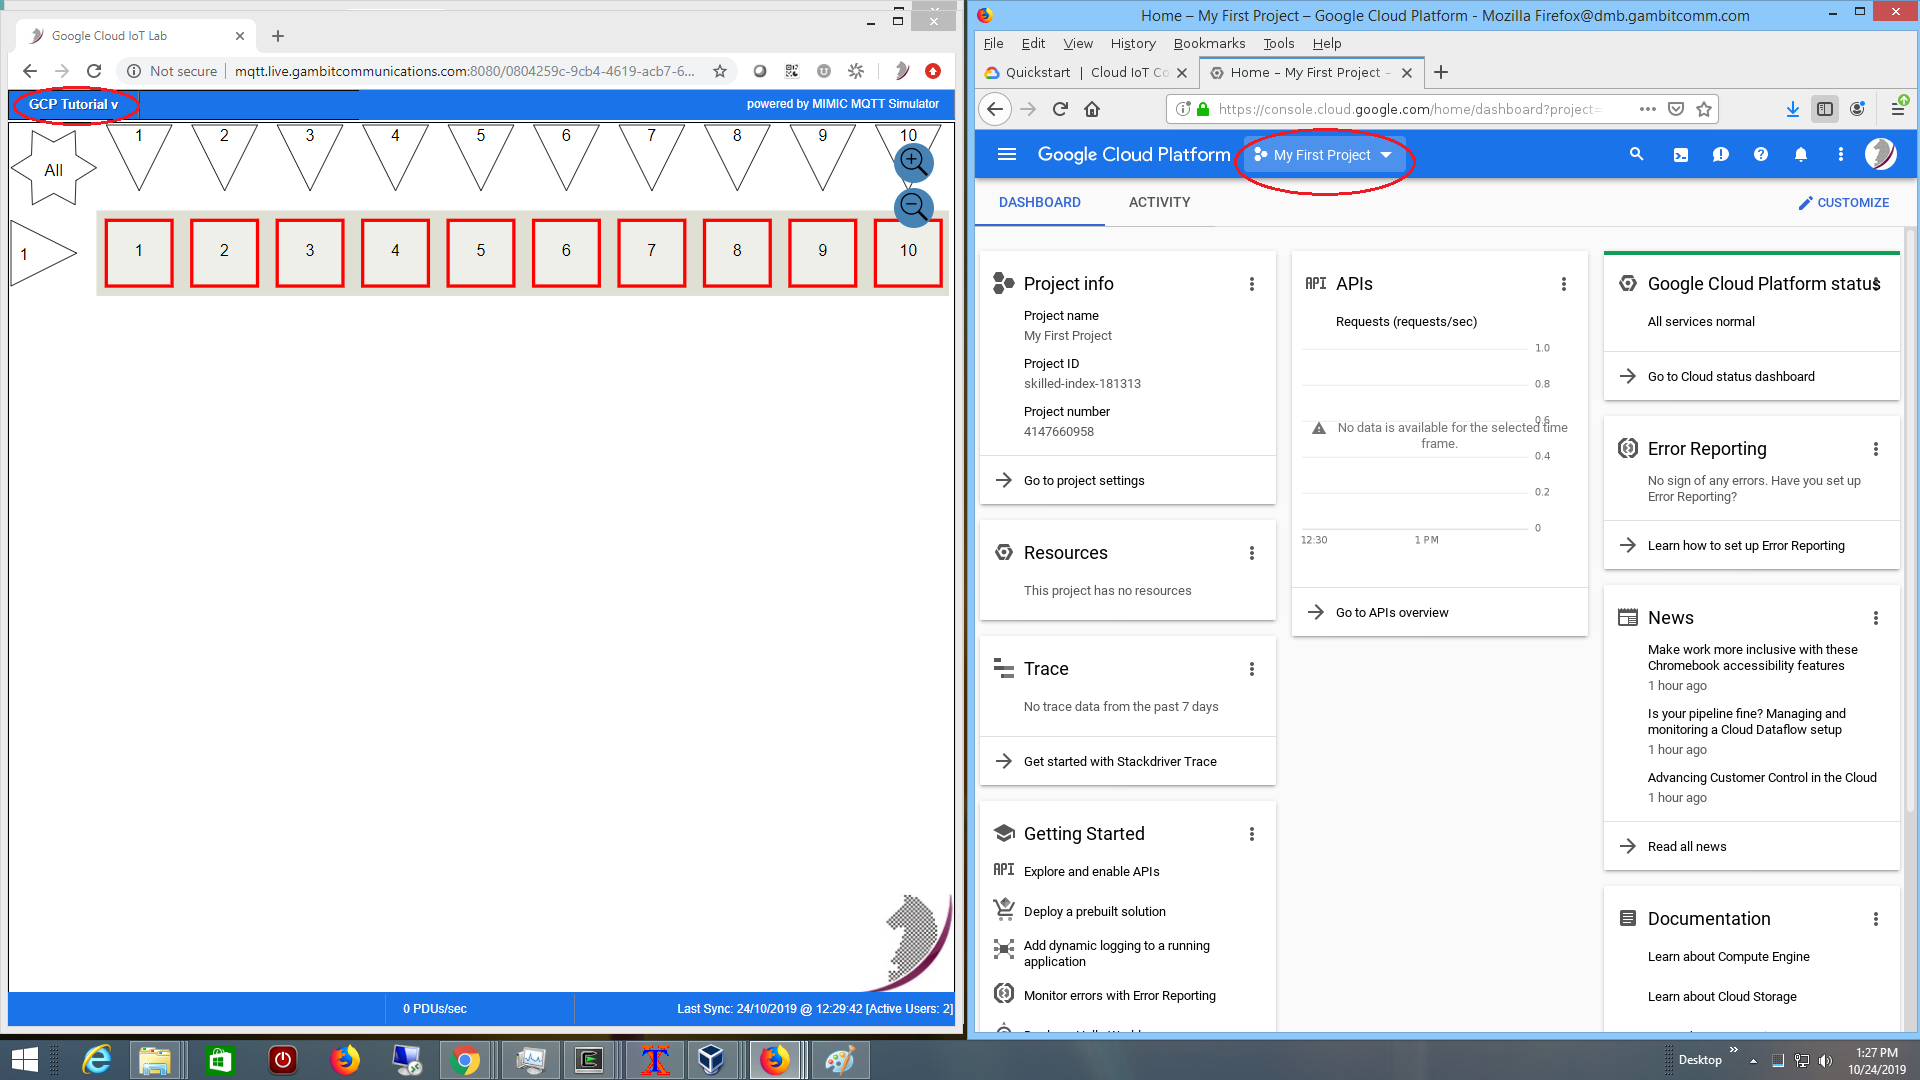
Figure 1 - 2 browser windows side-by-side
When we point to features in either of the windows, they will be highlighted with a red circle. For example, in Figure 1 above we have highlighed the main menu of MIMIC lab and that of the Google Cloud console. Check it out by clicking on the Figure 1 picture to open it (make it larger). Then press your browser Back button (left arrow) to get back to this page.
You can maximize either of them when working in one window for a while.
NOTE: this is the most complicated part of the tutorial, because we cannot automate it for you, and it shows you what is involved with Google Cloud for when you have to do everything yourself.
-
We first follow the steps from the Quickstart
Before you begin
section to create a project, enable project billing and the Pubsub API:
in the right browser window, in your Google Cloud console, just
pull down the top middle project list.
If you cannot find it, just go to the
project selector page
,
then click on Select a project.
Then select NEW PROJECT.
It should then say New Project in the
top left, as shown in Figure 2:
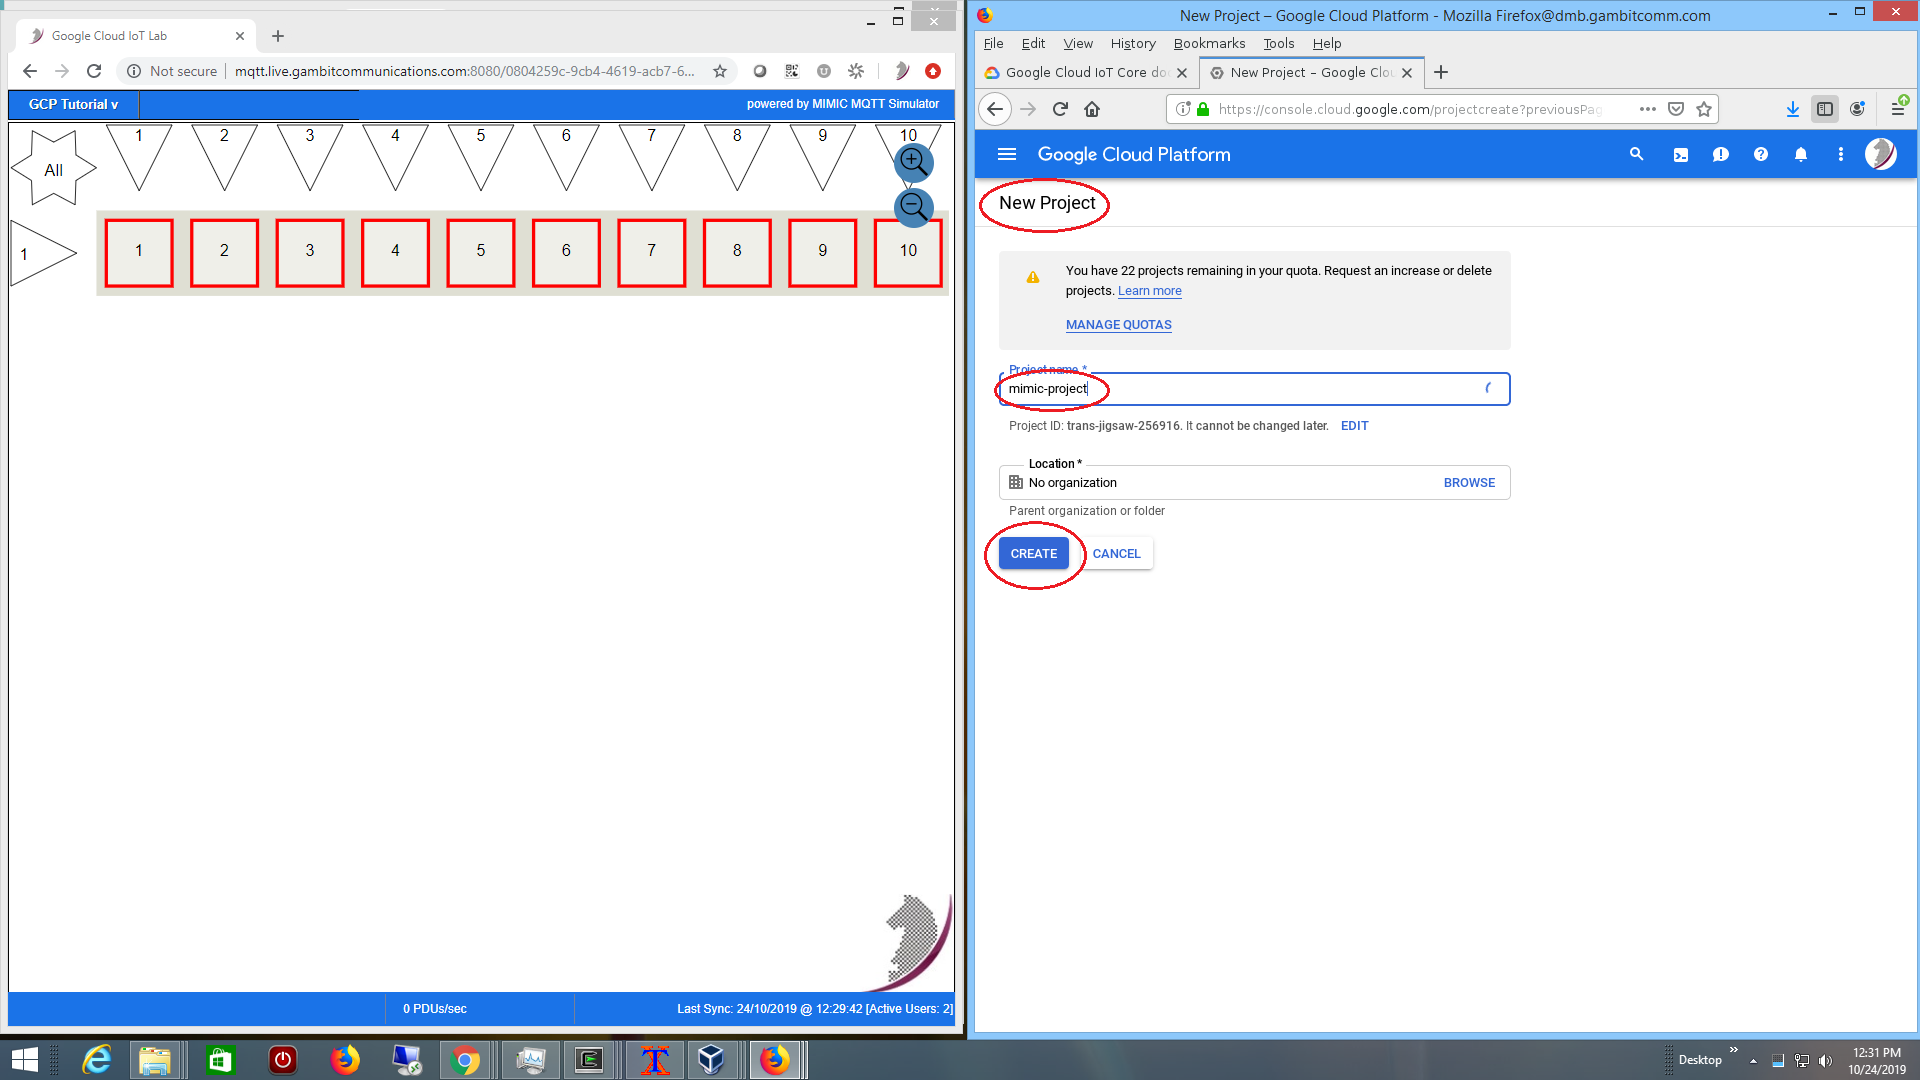
Figure 2 - New Project
Give the project a simple, yet memorable name, for example mimic-project. Then press CREATE.
NOTE: Unfortunately Google IoT does not use your project name, but a project ID that it assigns. Your project ID might differ slightly from the name you typed in. You need to use this project ID below, not the name. This project ID selected by Google IoT, eg. mimic-project-288318, is circled in the URL in Figure 3 below. Yours will be different. Remember your project ID, you will need it at the end of this step. It is referred to as YOUR-PROJECT-ID below.
-
Billing should be enabled by default, unless you have a complicated
billing arrangement, as detailed in their
page
.
-
Enable the IoT and Pubsub APIs at this
page
.
When it says The APIs are enabled, then click on Go to
credentials. The Credentials wizard for your project appears.
-
In the Add credentials to your project page, under
Are you planning to use this API with App Engine or Compute Engine?
select No, I'm not using them, then click on What credentials
do I need?.

Figure 3 - Add Credentials
-
Under Create a service account, pick a
Service account name, for example mimic-tutorial.
For Select a Role, under Cloud IoT pick Cloud IoT
Admin. Keep the Key type as JSON. When you click
Continue, it will download the keys in a JSON file.
Remember where your browser saves this file, you will need it later.
The dashboard reinforces this with this message:
Service account mimic-tutorial created. The account's private key
mimic-project-0279c3fed030.json saved on your computer.
mimic-project-0279c3fed030.json allows access to your cloud resources,
so store it securely. Learn more
You can press CLOSE for the last warning.
-
Next, we need to create a device registry for this project as detailed at
this page
.
We recommend the registry name mimic-registry
for the Registry ID. Select the desired Google region that
you want this tutorial to run in, for example us-central1.
For the Cloud Pub/Sub topics section, for the Default telemetry topic, we recommend just appending telemetry with a Google managed key, something like projects/YOUR-PROJECT-ID/topics/telemetry. This is where the default telemetry
will be sent by the simulated sensors.
Once you press CREATE you end up in the Registry details page.
-
In the left MIMIC MQTT lab window
click on GCP Tutorial. then Step 1: Setup....
This will from now on be referred to as GCP Tutorial -> Step 1:
Setup....
The Step 1: Setup dialog appears.
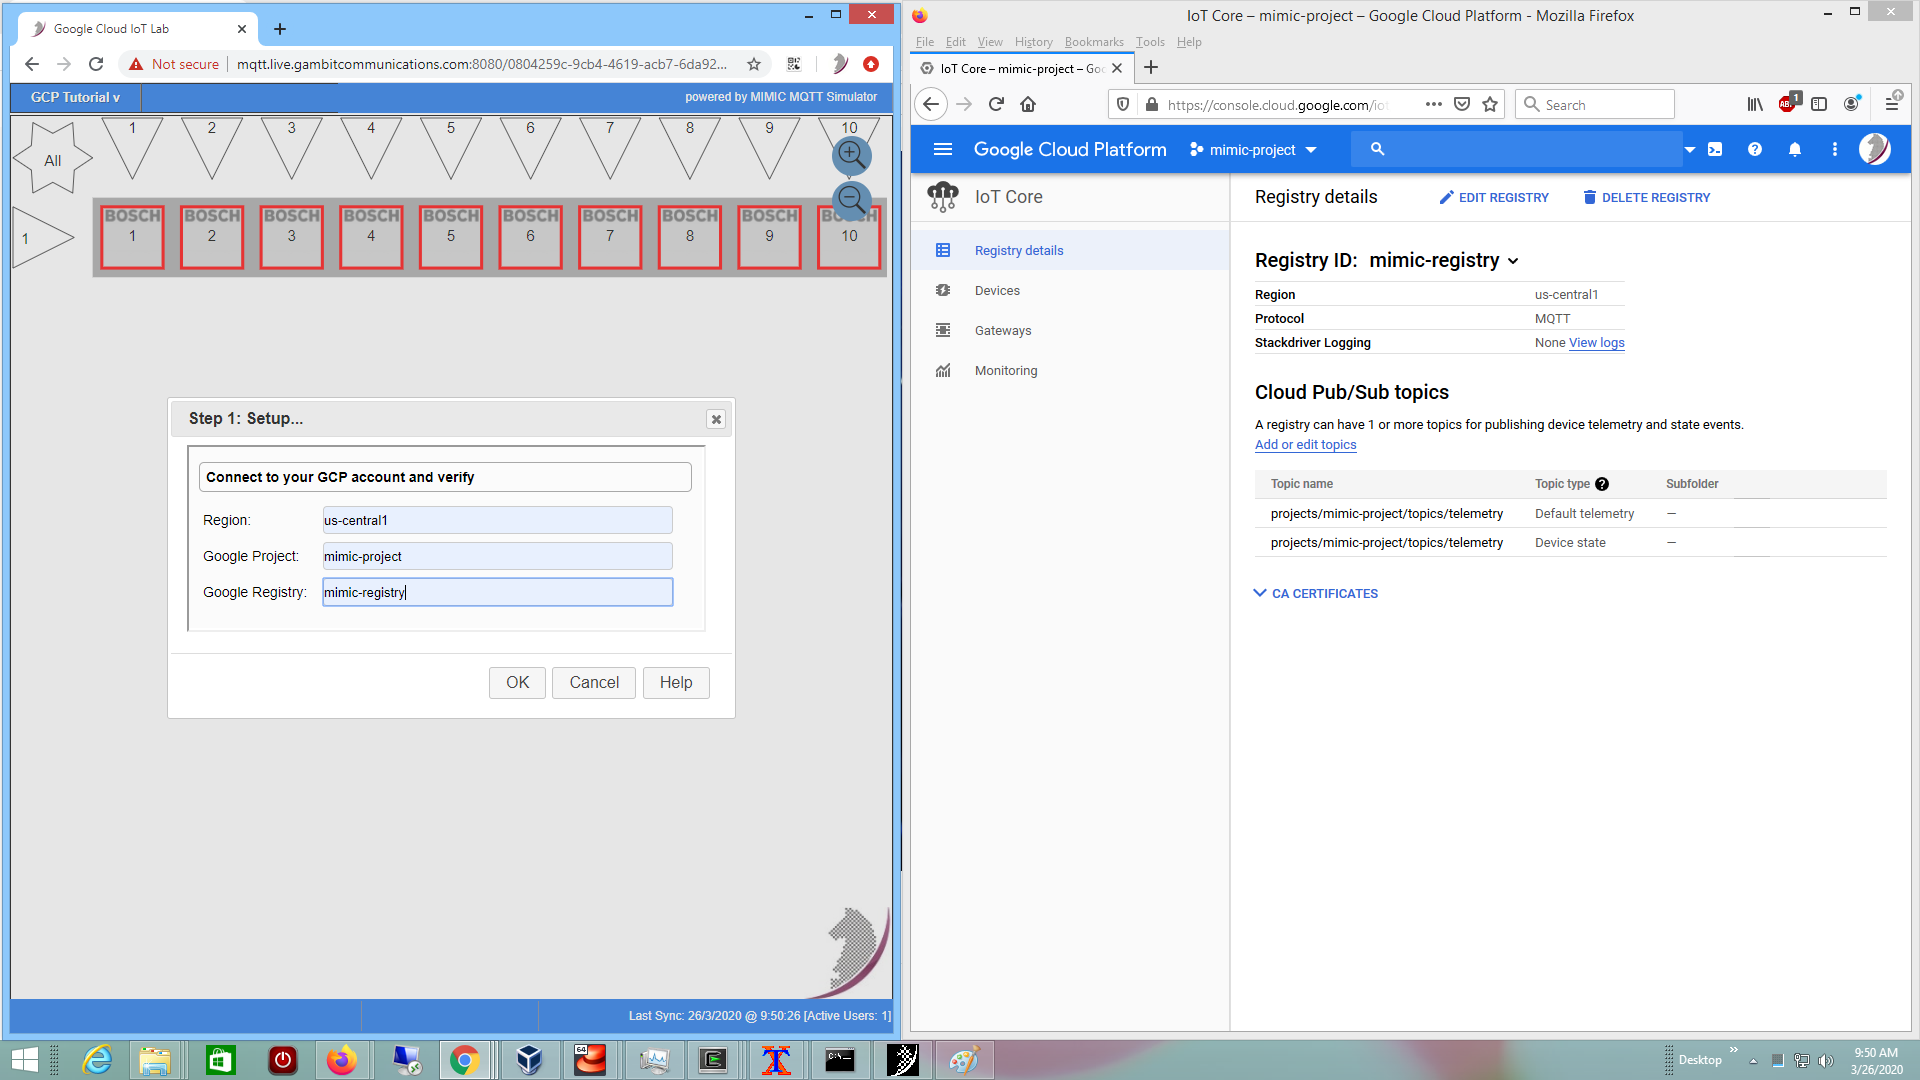
Figure 4 - Step 1: Setup dialog
-
Enter the GCP region that you want to have your IoT things to live
in, eg. the identifier after the Region in your GCP
console Registry details, eg. us-central1.
-
Paste the project ID that you copied above and fill in the registry ID
mimic-registry from above into
each the respective fields in the dialog, then press OK.
- Once you click OK, a new Run Script Console tab is opened in the left lab browser window with the output of the processing. When it says Task completed, and there are no ERROR messages, your lab is configured to work with your GCP temporary project.

Results
The temporary project, device registry is setup and you are ready to use the MIMIC MQTT Lab to add a device, investigate how it connects, and play with it.
Step 2: Add Device(s)
Objective
The left MIMIC MQTT lab browser window shows red icons, one for each simulated device. This is the equivalent of your real-world devices sitting on your lab bench. They are not doing anything.
We need to configure one of the devices to publish telemetry to Google Cloud IoT Core. This task configures Google Cloud IoT to allow access by the device, and configures the devices to use the access keys provided by Google Cloud IoT.
Procedure
-
In the right Google IoT console in Figure 4, if you press on the
Devices menu item on the left, you will end up in the
device list for the registry, which should be empty if you just
created the registry, as shown in Figure 5.
-
In the left MIMIC MQTT lab window
click on GCP Tutorial -> Step 2: Add Device....
The Step 2: Add Device dialog appears.
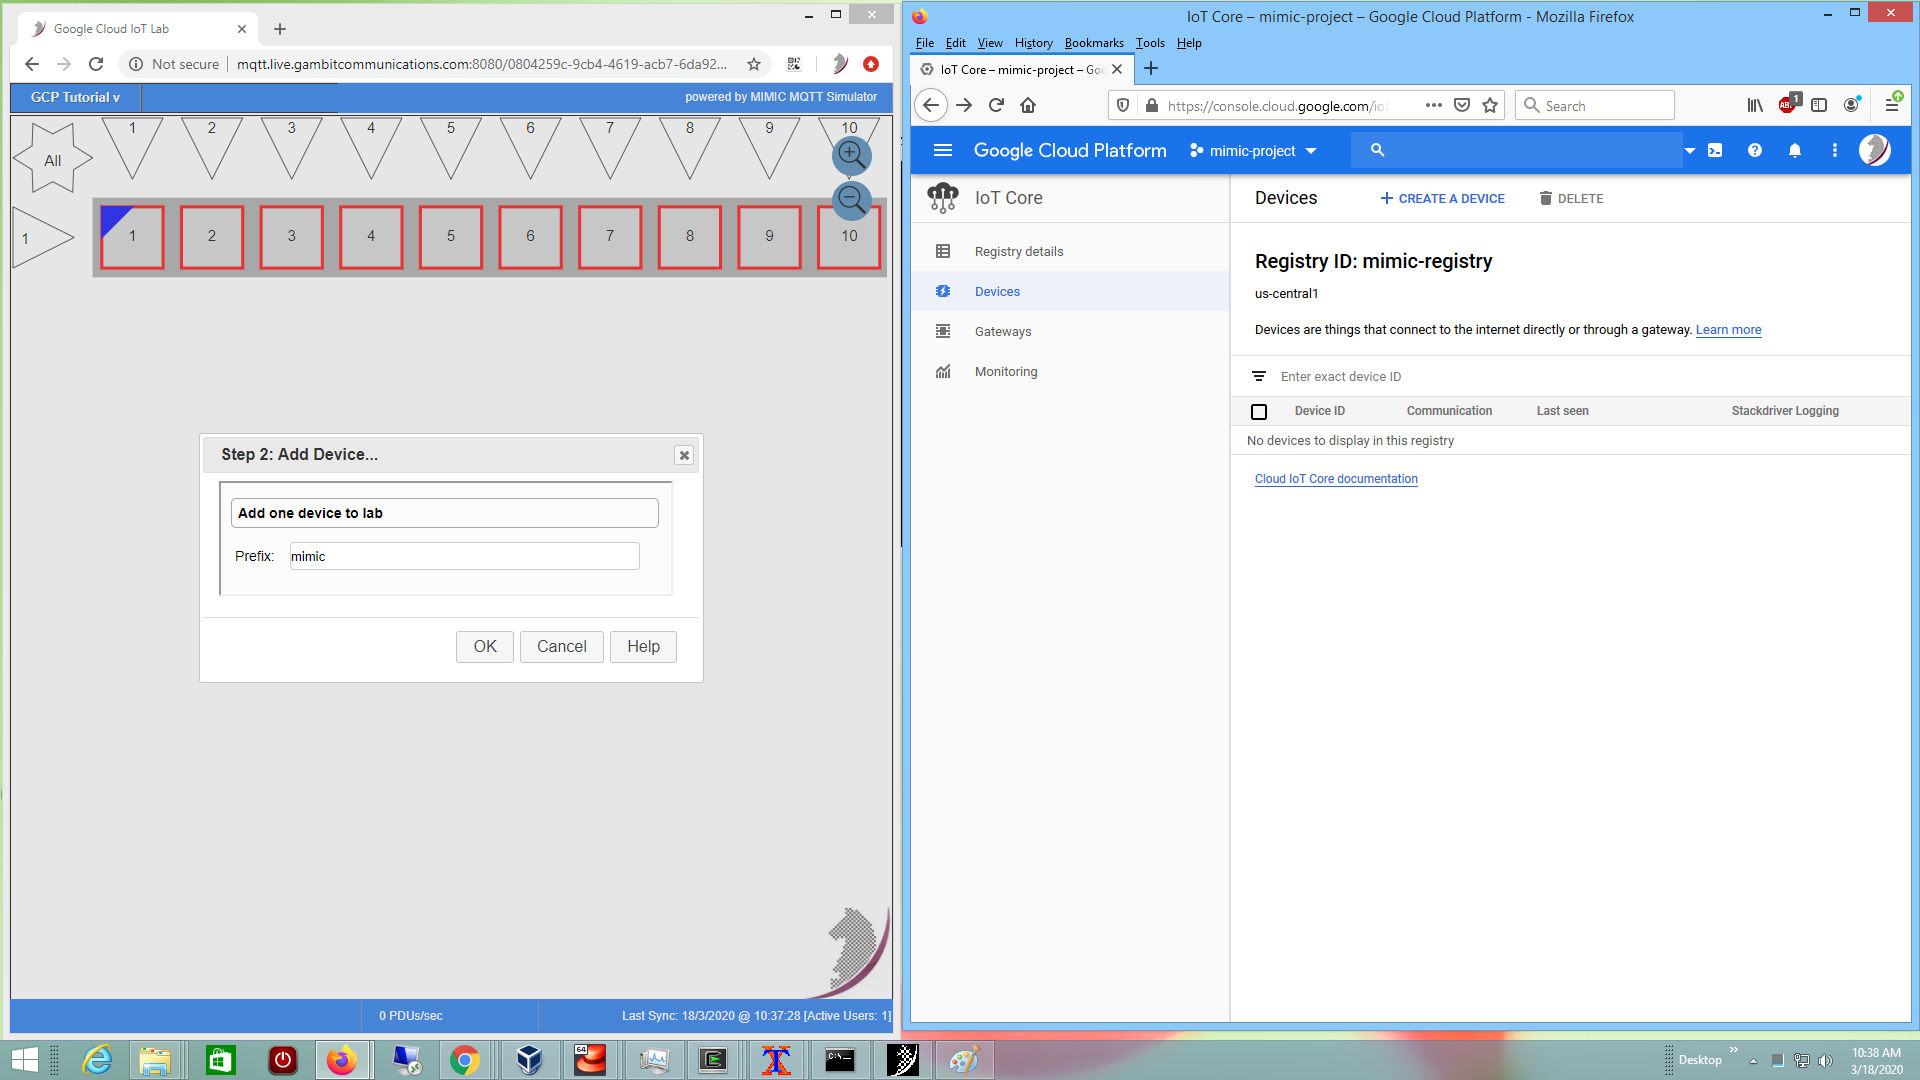
Figure 5 - Step 2: Add Device dialog
Type the Prefix for the Device ID of the device to be created in your Google Cloud account. We recommend to keep mimic, that way you can find it easily later. The first device will be named mimic1.
-
Once you click OK, a new Run Script Console tab is
opened in the browser with the output of the processing. When it says
Task completed, and there are no ERROR
messages, your new sensor device is added to your MIMIC MQTT Lab.
-
Before you dismiss this tab, you need to copy to the clipboard the public
key listed in the output, ie. all lines between (and including)
-----BEGIN PUBLIC KEY-----

-----END PUBLIC KEY-----
You do that by highlighting the text, then press Ctrl-C (the Control key and C key simultaneously) or select Edit menu, and Copy in your web browser.
-
Now you can switch back to the lab browser tab titled
Google Cloud IoT Lab. You can dismiss the Run Script Console
tab later when everything works.
-
If it does not have it already, when you now reload the MIMIC MQTT
Lab window, the first icon should have a name underneath its number,
eg. the first device will be named mimic1. It is
red
because it is currently stopped. This is the equivalent of the
device sitting on your lab bench in the real world with power switched
off.
-
You don't need to create a device key pair as detailed at
this page
.
We already did, and it is saved in the lab.
-
We need to add a device to the Google IoT registry:
In the right Google IoT console in Figure 5, press CREATE A DEVICE.
In the top input field labelled Device Id give it the same name as you just created in the MIMIC MQTT lab, ie. for the first one by default mimic1. If these names don't match, your integration will fail.
Expand the section COMMUNICATION, CLOUD LOGGING, AUTHENTICATION and in the section Authentication (optional) keep the Enter manually section, and for the Public key format selection list keep RS256.
Then paste the public key you copied above into the input field labelled Public key value. If shows you the format that the field should be in, which should be what we copied above in the MIMIC MQTT lab window Run Script Console tab.
When you press CREATE, the device is created.

In your
Google IoT console
![]() ,
under the Devices menu you will see
the newly created device:
,
under the Devices menu you will see
the newly created device:
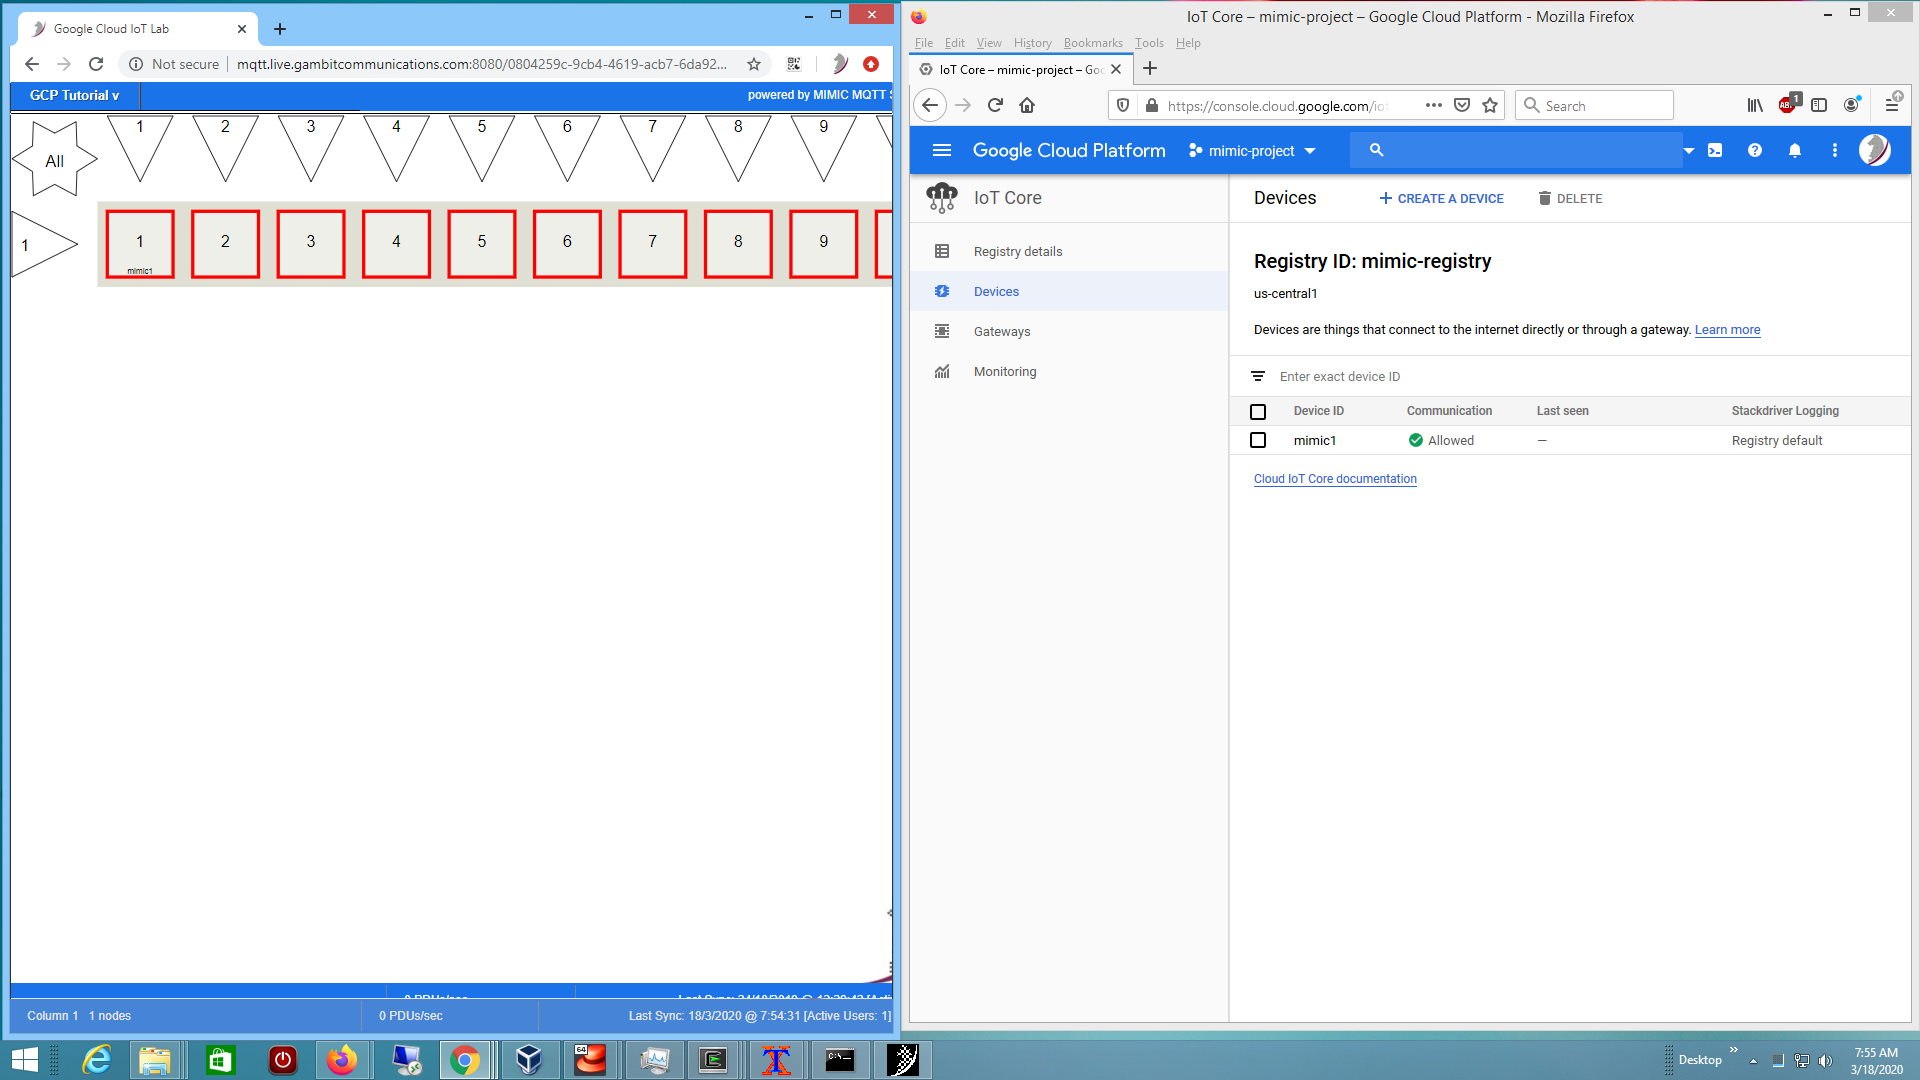
Figure 6 - Step 2: Device in Google IoT
NOTE: The new devices are created in your registry in your home region, eg. us-central1, and will not show if you navigate to a different region, eg. europe-west1. If not sure, click on the top left "triple bar" navigation menu icon to get you to your home region dashboard.
Results
So far we did the following in Google IoT:
-
created a temporary project for this lab to access Google IoT;
-
created a registry mimic-registry to allow IoT operations;
-
created a device with Device ID mimic1 and unique certificate and keys;
- integrated the three into the MIMIC MQTT lab.
You can click on the thing in your Google IoT Console and investigate its settings. You are now ready to experiment with this device in the next sections.
Using the lab
To start using the lab, first verify that at least one thing with the chosen
prefix, eg. mimic1, is showing in your
Google IoT console
![]() as shown in Figure 6 above.
as shown in Figure 6 above.
Step 3: Start Device(s)
Objective
The devices in your lab are stopped, equivalent to lab equipment sitting on your lab bench and powered off. So they are not doing anything. We need to power up the recently configured device, the one that is labelled mimic1.
Procedure
To start it, select the red icon(s) of the device(s) you want to start. Each selected device will have a blue indicator in the upper left. Then click on GCP Tutorial -> Step 3: Start Device(s) -> Go!.
The selected icon(s) will turn green, as if you had turned power on.
Just like the equipment on your lab bench, whether it delivers telemetry to Google Cloud IoT or not depends on whether you have configured the correct parameters in the MQTT client software.
In this lab, if you added the device as in the section above and there were no errors, then it will publish telemetry once a second. You will know that it works when a orange <--> arrow appears in the icon, indicating activity.
In your Google Cloud Iot Console, you can create a PubSub subscription
in the
Pub/Sub console
![]() as shown in this 2-minute Youtube video:
as shown in this 2-minute Youtube video:
In particular, we made it so that the light value changes frequently at random, like a flickering light. Try following the steps by watching the video.
Results
The icon of the selected device shows green to indicate that it is started, and telemetry is published to Google Cloud IoT. Now you can investigate further how things work, and change telemetry on the fly.
Step 4: Investigate
Objective
Now that it is running, you'll want to see how the lab device and your Google Cloud IoT Thing are linked. That way you can reproduce this with your real devices.
Procedure
To check the configuration of the device in your Google Cloud IoT Console,
click on the device, and then click AUTHENTICATION.
It shows the public key for SSL communications, when you click
on it.
Those determine how your MQTT device can
interact with Google IoT Core
![]() .
.
To check the configuration of the simulated device in MIMIC, select the device icon in the lab, then click on GCP Tutorial -> Step 4: Investigate -> MQTT Configuration...
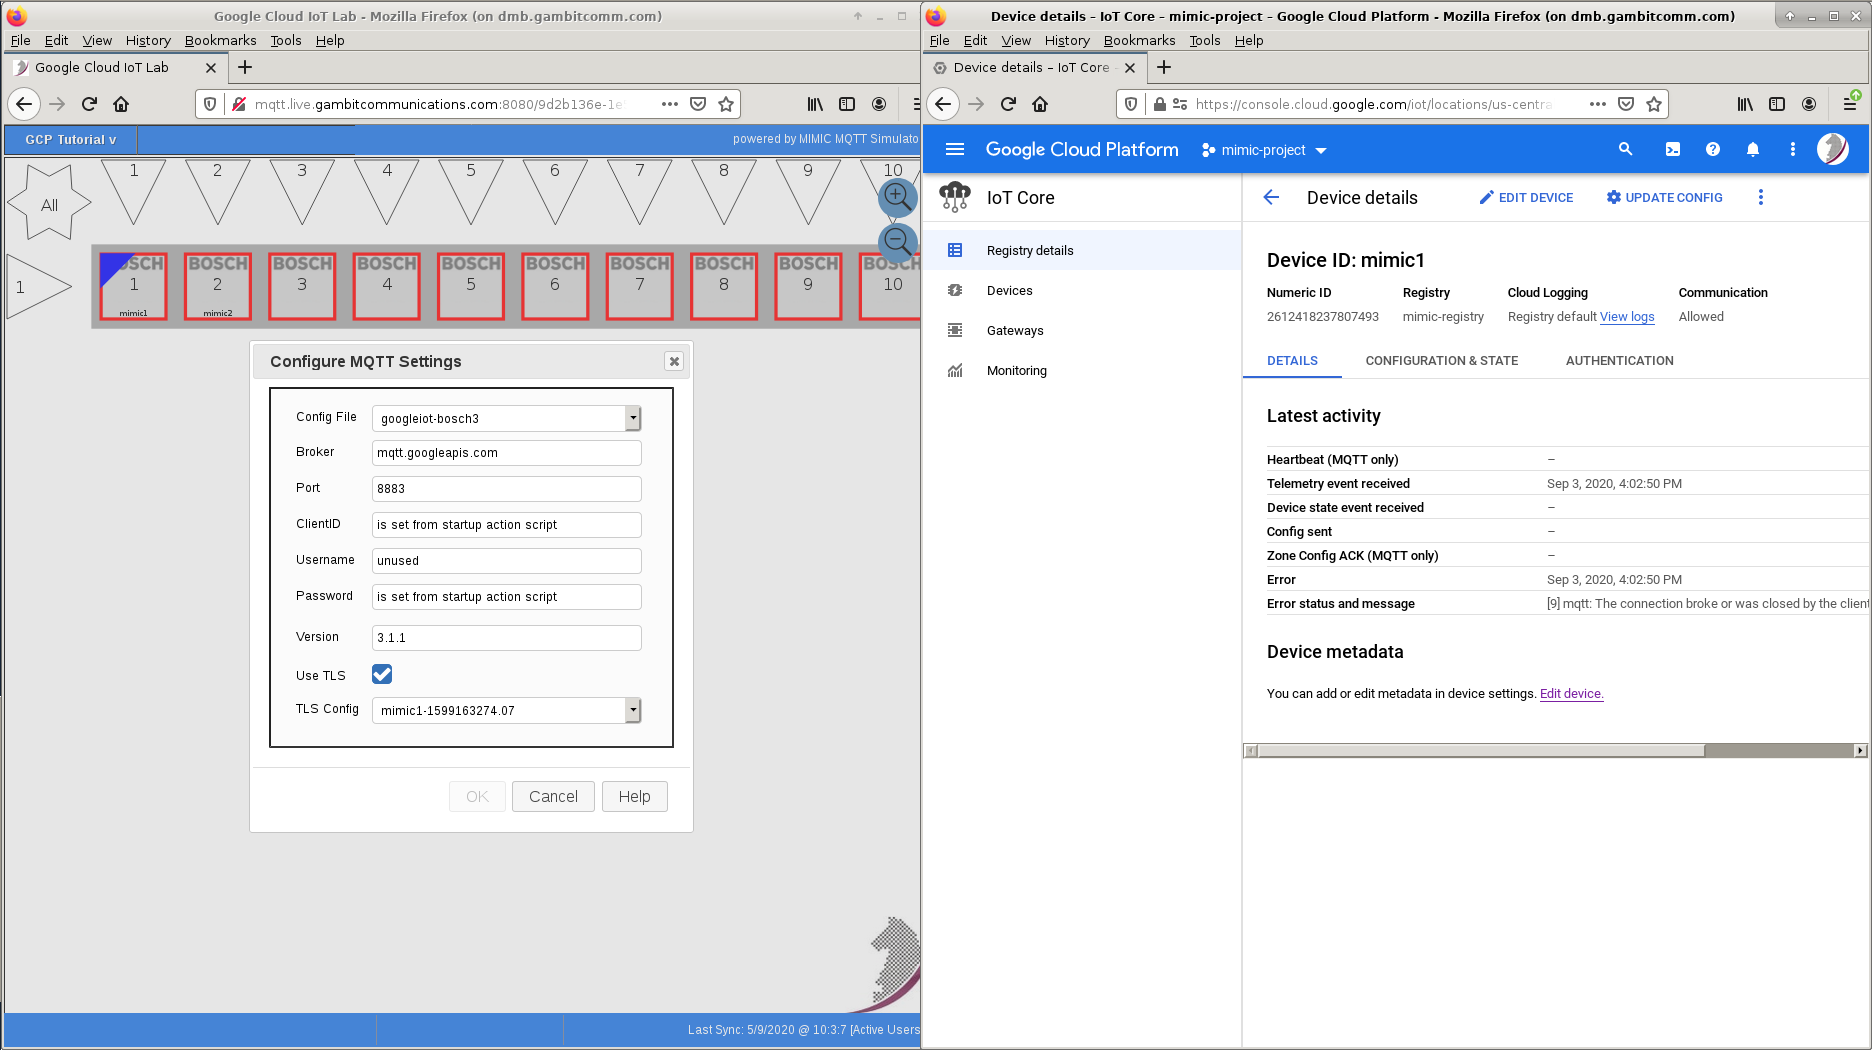
Figure 7 - Step 4: MQTT Configuration
The important configuration parameters for the device are the
-
Config File - this defines the MIMIC simulation: what MQTT payload
to send where and when. Here we publish once a second to the
event topic
the telemetry with a JSON message containing default
Bosch XDK
telemetry:
{
"sn":"20:19:AB:F4:0F:E2",
"data":{
    "acc":{
	"x":26,
	"y":32,
	"z":1012,
	"unit":"mG"
    },
    "gyro":{
	"x":1220,
	"y":-6835,
	"z":-2319,
	"unit":"mdeg/s"
    },
    "mag":{
	"x":40,
	"y":1,
	"z":-4,
	"unit":"uT"
    },
    "light":{
	"value":22394,
	"unit":"mLux"
    },
    "temp":{
	"value":50000,
	"unit":"mCelsius"
    },
    "pressure":{
	"value":98897,
	"unit":"Pascal"
    },
    "humidity":{
	"value":39,
	"unit":"%rh"
    }
}
}
The sn value is assigned uniquely at device start, simulating attributes that are determined at device startup.
The light value changes at random for this tutorial. This simulates a very dynamic attribute that changes at every sample.
Finally, the temp values can be dynamically controlled to achieve on-demand, consistent, real-time results, eg. in the Step 5: Change Telemetry section below.
-
Broker - your Google IoT MQTT server
-
Port - 8883 for secure MQTT communications
-
ClientID - set to the full device path, eg.
projects/YOUR-PROJECT-ID/locations/YOUR-REGION/registries/mimic-registry/devices/mimic1
-
Username - is not used in Google IoT
-
Password - the password is a JSON Web Token generated dynamically
for every connection from your configured device keys as detailed at
their page
Using JSON Web Tokens (JWTs)
- TLS Config - uses the certificates assigned to the device in Step 2 above.
These are the configurables you would have to setup in your real-world device to communicate with Google IoT.
NOTE: The OK button is disabled in this lab. More advanced labs allow you to configure anything on the simulated devices.
You can investigate the TLS certificates with Step 4: Investigate -> TLS Configuration...
Results
We verified the necessary configuration for a device to communicate with Google Iot Core.
Step 5: Change Telemetry
Objective
You are seeing real-time, dynamic telemetry in your subscription on Google IoT. The temp value is static, while the light value changes at random, like a flickering light. In this task we will interactively change the temperature to some other predictable value. This lets you change the temperature on-demand, eg. a device over-heating. Imagine the effort to do this with a real device.
Procedure
If you have not done so already above, in the MIMIC lab window select the green icon(s) of the device(s) you want to manipulate. Each selected device will have a blue indicator in the upper left. Then click on GCP Tutorial -> Step 5: Change Telemetry....
In the Step 5: Change Telemetry dialog, change the Temperature value to something else, eg. 23315. As soon as you click OK, the new temperature value is published.
In your Google Iot Console, you can pull messages in your PubSub subscription and the new temp telemetry will be reflected, as shown in this 1-minute video:
This is very clumsy, since we are using the simple built-in facilities of Google IoT. In Step 7 below we will explore advanced ways of displaying the telemetry, but it will require much more effort.
Results
We changed temperature telemetry on the fly, on-demand, predictably. You can use this technique when it comes to testing your application for certain conditions.
Step 6: Stop Device(s)
Objective
Your lab devices are continuously generating telemetry and publishing messages to Google IoT Core. This task stops them, the equivalent of powering down the real equipment.
Procedure
In the MIMIC lab window select the green icon(s) of the device(s) you want to stop. Each selected device will have a blue indicator in the upper left. Then click on GCP Tutorial -> Step 6: Stop Device(s).
The icon(s) will turn red, and messages cease to be published.
Results
We stopped the devices to stop publishing messages.
Step 7: Advanced Tasks
These are further optional tasks you can do in your lab:
-
you can repeatedly do
Step 2: Add Device
, and it will add more things with incrementing instance number upto
the total allowed in your lab. Once you start the lab devices,
you will see independent telemetry for each;
-
you can run a better subscriber application to implement simple
anomaly detection:
detect values above a threshold as implemented in this
open-source application in our
Github repository
and shown in this 2-minute
Youtube video
;
-
you can integrate your GCP devices with
Losant
to monitor your devices and perform analytics. For example, this
Losant workflow collected the telemetry of our devices into a
Losant table for further processing:
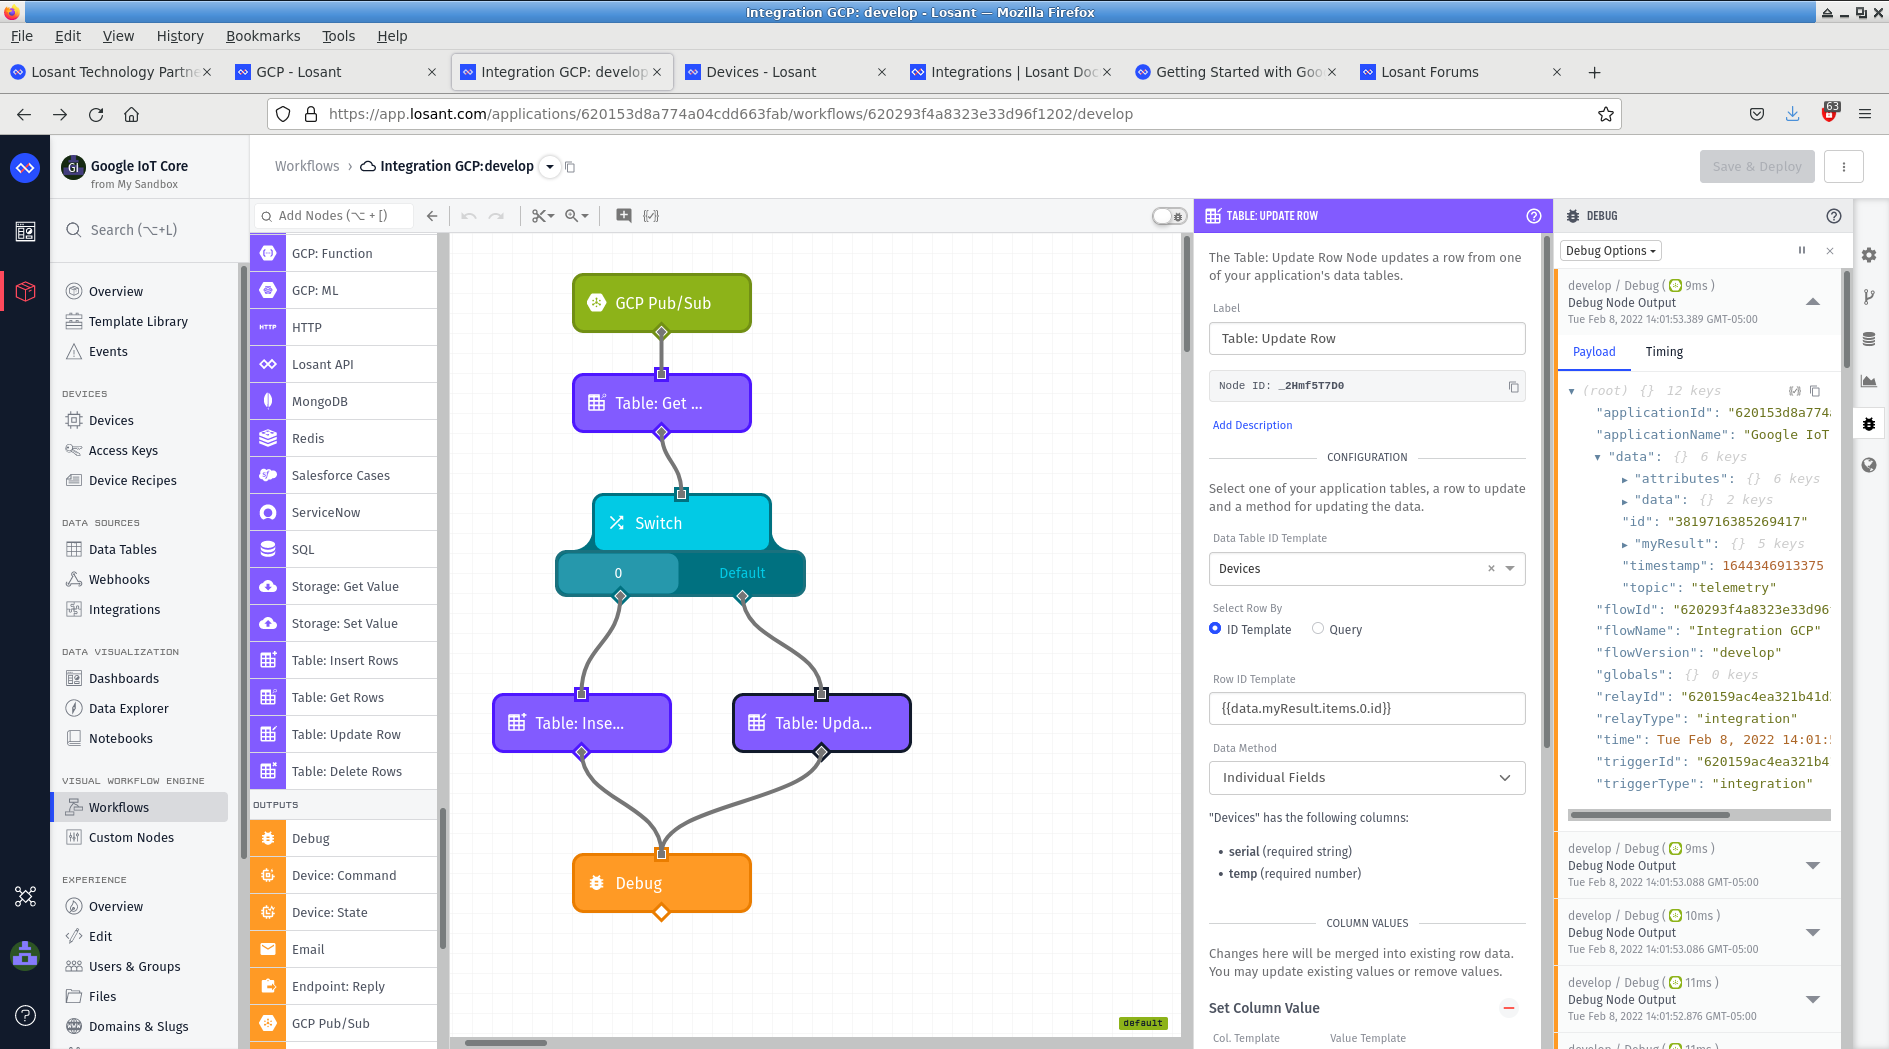
Figure 8 - Losant GCP integration

Step 8: Cleanup
Objective
Once a lab is setup, you want to clean it up when you are done, to be certain no left-over devices have access to your account. This procedure makes certain there are no left-overs.
Procedure
The GCP Tutorial -> Step 8: Cleanup... lets you cleanup devices setup in the lab. Just select the device(s), then that menu item cleans up any associated resources from the MIMIC MQTT Lab. You also need to delete each device from Google IoT Core.
Once you have deleted a device, you can add one back in with different credentials with the Add step above.
To clear the rest, as detailed for Q: What about security / privacy? in the next section, ie.:
- remove the temporary project mimic-project that we created in Step 1 above in your Google IoT Console under the IAM menu, Settings item. Just click SHUTDOWN and it will remove all resources associated with the project.
Frequently Asked Questions
- Q: What will this cost me?
A: Besides the fixed cost for the MIMIC MQTT lab, there will be minor Google Cloud IoT costs
in your Google Cloud account that we cannot control, most likely less than
$1. Well worth the savings in effort in seeing a third-party device
publish to the Google Cloud IoT device state in under 5 minutes.
- Q: What exactly does this do to my Google Cloud account?
A: You setup a temporary project mimic-project in the above Setup.
If you run the Step 2 - Add dialog with your Google authentication parameters it will setup exactly 1 device instance with an associated certificate that links to the mimic-project project. Any subsequent device additions create a new certificate and thing that link to that project.
- Q: What about security / privacy?
A: The lab will be able to access your account during the session because access tokens are stored in the lab configuration. You can delete the temporary project mimic-project that you created in the Setup section above. Then you can verify that the devices can no longer talk to your account. This is verifiable cleanup, ie. you have proven that the outside device cannot access any more.
- Q: What next?
A: This lab gives you a small successful step in connecting a few third-party sensors publishing real-time, dynamic, predictable, controllable telemetry to Google Cloud IoT Core device in a matter of minutes. The next steps are up to you:
- You can build on what you learned to connect your own devices to
Google Cloud IoT Core;
-
Explore our other free resources / videos to learn about solutions to
common problems you will encounter in IoT development;
-
You can rent a lab anytime you need to test different aspects of your
application, or lease a longer-term
MIMIC MQTT Simulator
with more features;
- You can scale the deployment to as many devices as you need to test, demo, train your IoT Application.
- You can build on what you learned to connect your own devices to
Google Cloud IoT Core;